
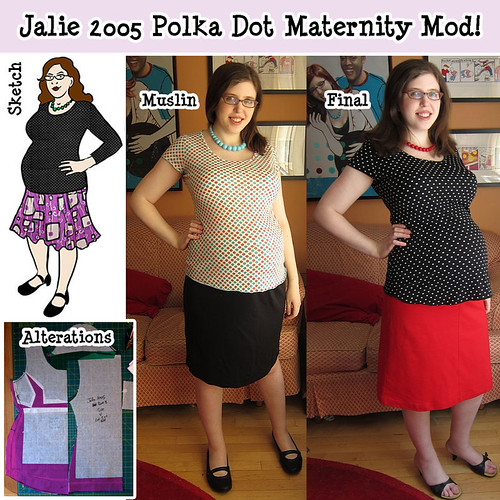
So I FINALLY finished one of my PatternReview Spring Mini-Wardrobe Contest pieces, the black & white polka dot top. I even wore it to work today!
Pattern Review: Extensive maternity modification of the popular, infamous (and now out-of-print) Jalie 2005 "Choice of T-shirts" pattern. The poor thing is barely recognizable under all my changes!
Inspiration: I needed 4 pieces for the mini-wardrobe contest that could combine to create at least four outfits. I decided to do 1 top, 1 (reversible) skirt, 1 dress/jumper and 1 top/cardi/jacket.
For the top I wanted to sew something that would be fun and interesting on its own--but quiet enough to pair with the patterned skirt, and fitted enough to go under the jumper/dress. The latter was the real challenge--I have a lot of top and blouse patterns with plunging necklines and fussy detailing (gathering/ruching/bows/whatnot), but in order to pair with the Parfait dress, I had to go with a relatively high round neckline and a smooth silhouette.
So I selected the simplest top pattern in my stash: a fitted, non-maternity, short-sleeved crew-neck T-shirt. Then I went to town with my rulers, tape, scissors and curves to make it into the scoop-necked, cap-sleeved, full-busted maternity T of my dreams!
As for the print... you might have noticed... but I like polka dots.
Photos:
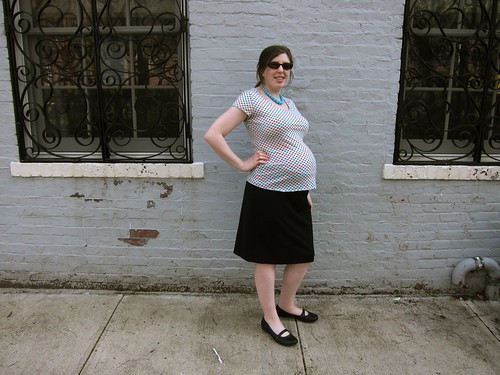
The polka dot (wearable) muslin ranging free in the wilds of Brooklyn, paired with a $2 thrift store skirt. (And yes, I am almost always this pale!):
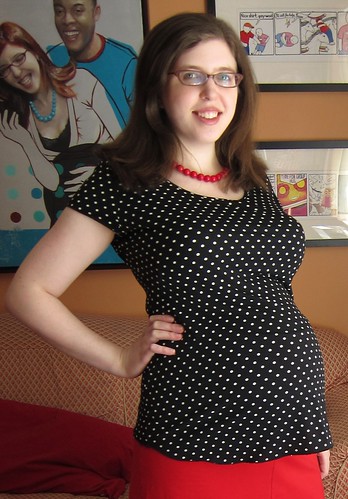
Front view detail:
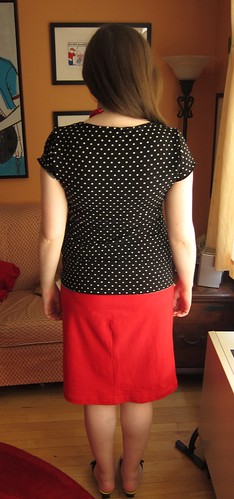
Back view (shown here with my BurdaStyle "Melissa" maternity skirt modification):
Read my entire excruciatingly detailed review, with explanations & photos of how I did the modifications after the jump!
Pattern Description: Basic fitted T-shirt pattern with short or 3/4 length sleeves and V, crew or boatneck. I started with the short-sleeved crew-neck version. I had originally planned to make 3/4 sleeves... but it's been so warm out lately!
Pattern Sizing: The usual huge range of Jalie sizes coded by letter. My high bust is 36" and my full bust is 41", so I debated for a bit between tracing sizes V (bust size 35") and W (36"). I went with V based measurements of my favorite Ts, and my preference for close-fitting tops (some examples I saw in other reviews were baggy). In retrospect, the W would have been the better choice--but I made the V work with a lot of adjustments.
(Maternity Sewing Note: I had a 34" high bust pre-preggo--but my ribcage has been rapidly expanding to make room for Cartoonist Baby. We'll see if it contracts later!)
Did it look like the photo/drawing on the pattern envelope once you were done sewing with it? Not even slightly, but it looked like my sketch!
Were the instructions easy to follow? They were vague and confusing, but I didn't bother with them--it's a T-shirt, after all!
What did you particularly like or dislike about the pattern? It's a good simple starting point for an endless variety of modifications--practically a knit top sloper/block.
Fabric Used:
- For the muslin: Orange-and-teal polka dot rayon/poly/lycra from Fabric.com at $5.98/yard. I bought it to meet the free shipping threshold on another order, and it had similar cross-wise stretch (about 40%) to my fashion fabric (about 50%). But don't rush out and get this stuff--I nearly returned it when it arrived. It does NOT have the silkiness/softness/richness/stretch I normally expect from rayon-blend knits, it's quite thin, and the colors are pretty faded. Great for a cute summery weekend top or tank, but not for work wear. I used less than a yard.
- For the final: B&W polka-dot ITY poly jersey from Spandex House at $6/yard (the rewards of a long and painful quest). It was my first time working with ITY and I loved it--it doesn't seem to curl or fuss or wrinkle as much as other jerseys. Still, it is poly, and not quite as breathable as the cotton or rayon-blend knits I've worked with in the past. Again, I used less than a yard.
Approximate Cost Per Top: $5 worth of fabric + $5 for the pattern and tracing material (half the cost since I've made it twice) + negligible amount of serger thread = $10.
Alteration Process, Round 1:
- The Scoop Neck: With the help of my Fashion Styling ruler, I lowered the neckline on the front pattern piece by 2 1/2" and widened it by 1 1/2" (3" total added width). This was just a guess, but it turned out perfectly:
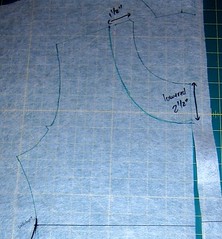
I also continued the curve of the widened neck on the back pattern piece so that they would match up:

- The FBA. Since the pattern is designed for a 35" bust and my full bust is 41", clearly an FBA was in order. After stretching the fabric around myself in a mirror (very scientific!) and measuring the flat pattern pieces I decided to do a 1.5" FBA (to add 3" total).
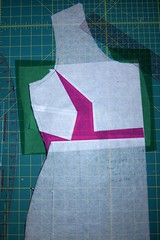
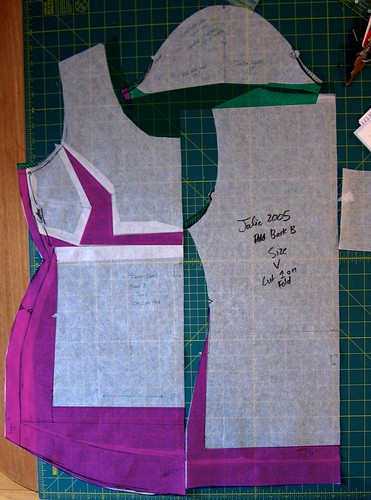
BUT I wanted to keep the underbust narrow/fitted--it's the closest thing I have to a waist these days! So I cut the bodice from the belly around the underbust, and did a standard Fit For Real People-style FBA (additions highlighted in pink):
This created a horizontal bust dart--and who wants a horizontal bust dart in a fitted T-shirt? So I followed the FFRP directions for closing the dart and redrawing the side seam--this also created extra length in the side bust area, but I just eased in the length when I sewed up the top:
- Maternity belly adjustment: I started with the same Rostitchery tutorial I used to adjust the tummy for my Burda 02-2010-122 top (found via Assorted Notions):

I do love that top, but I didn't like the ruffly bell effect at the center front. So this time, once I got past the belly, I made the top pattern straight instead of continuing to flare out. I also added 1" length to both back and front, and an additional 2.5" length to the front center, tapering out to the side seams:
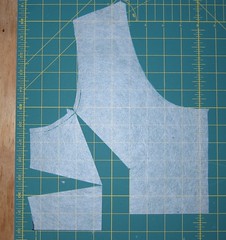
- From Short Sleeve to Cap Sleeve: Using Sew U: Home Stretch as a reference, I cut off the sleeve hem entirely, then removed 1" from each side of the sleeve, curving up to 1.5" in the center (removed bit highlighted in green):
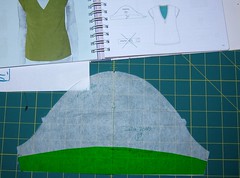
This muslin was the result (blogged in detail here):

It turned out a bit tight in the bust, belly and armhole, and not quite long enough for my liking. Still, it was adorable, so I finished the sleeves and bottom with a wooly nylon & rayon turquoise rolled hem (I didn't want to shorten it further with a twin-needle hem), bound the neckline with a 1-inch strip of self-fabric (top-stitched with a twin needle), and took it out for a spin!
Alteration Process, Round 2:
I didn't take step-by-step photos here, but rather than play around more with the FFRP FBA, I:
- Added 1/2" to the front sideseams (and a corresponding amount to the front part of the sleeve) for a 1" total width increase.
- Lowered the armhole (and corresponding bit of the sleeve) by 1/4".
- Added at least 1.5" to the length--I don't remember exactly.
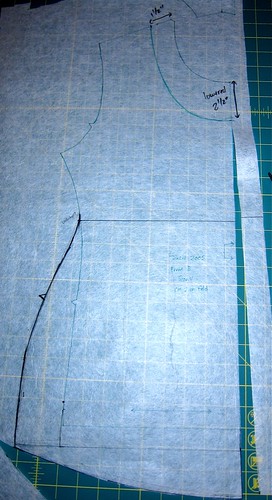
The below image shows ALL my alterations in the end--the white part is the original pattern, the pink is my additions. Whew! I'd like to say it was all worth it to obtain a TNT pattern, but there are no "tried and true" patterns in the world of maternity, since my belly will be downsizing drastically starting in 8-12 weeks. Still, I felt like a maternity-adjustment ninja when it was all over!
I liked the rolled-hem look so much that I used it again on the sleeves and bottom for the final top, though I did a "mock bind" instead of a full bind on the neck.
Successes: Two perfect polka dot tops in one day--what's not to love? They're fitted, but not too fitted, and totally fun. And I'm getting so used to making major maternity adjustments, it's almost a shame my pregnancy is coming to an end. Still, I'll always have major FBA action in my life! And, bonus: I am loving ITY jersey and have a great local source for it in Spandex House.
Room for improvement?: I am still working on my neckline binding techniques. The binding on the muslin was a bit stiff and not quite tight enough, and the topstitching wasn't perfect on the final top. But WHATEVER. These tops rock my pregnant world!
Would you sew it again? Would you recommend it to others? If I should find myself bereft of tops towards the end of my pregnancy, I may whip this out again. But I can easily alter it for non-maternity next time when I want a cute scoopneck T in the future. And yes, this is a great basic pattern to have in your stash.
Conclusion: One mini-wardrobe piece down... three to go! Also: hurrah for polka dot tops!


Have a post coming up on my initial attempt at the FBA. Can't say it was a success for me. But I will prevail. Did it take you a while to make it work? Or were you all good on the first attempt?
ReplyDeleteMy first FBA attempts back in 1998 were total failures, but I think that was more the reference material I was using--I followed directions that I think were intended for less drastic FBAs. However, even though I have now done MANY MANY FBAs, they don't always work out, which is what muslins (or tissue fitting, if that's more your style) are for.
ReplyDeleteOK, I'm so glad to hear I'm not a total loser. I mean, if even you have struggled, it's a worthy journey :-)
ReplyDeleteI think I may have to go more drastic. I did 2.5 inch but the top still isn't sitting right.
I did the Y version of the FBA (from FFRP). It's not the one they show on the DVD, which I also watched. It's for more significant FBAs. I don't really know if 2.5 warrants the Y method. Do you use it?
Do you find that, just by looking at a pattern (or a photo of the completed garment), you can tell if it will work or not with that particular item?
Oh my goodness, it's adorable! Super flattering on you. I hope to look half as cute when I'm (hopefully) pregnant someday!
ReplyDeleteThe finished top looks really lovely. What a great fit.
ReplyDeleteLove the details of the alterations you made. As an FBA-novice, it was a revelation to hear that you don't have to keep the horizontal bust dart ... and great to see a real life example. The photos are very helpful. (I am very happy to see a proper example of what to do with my Jalie tee before I hack into the pattern!)
Look forward to seeing what you make next for your mini-wardrobe.
Lovely top and it is very flattering on you.
ReplyDeleteYou write great reviews and your in-depth thought and construction processes are extremely helpful.
Looks great! :D
ReplyDeleteAw, thanks everyone! And yes, Liesl, you don't need to keep a horizontal bust dart--especially on knits. In wovens I usually leave it in, unless it really clashes with a print or competes with the design (it's harder to ease in the extra gracefully on many woven fabrics).
ReplyDeleteYour posts on maternity clothing are so helpful! I too am pregnant and there are absolutely no cute maternity clothes, so I have started to sew my own.
ReplyDeleteGlad to hear it Anna--and I totally agree. Take skirts--RTW maternity skirt options are pretty much... boring black jersey skirt... boring grey pinstriped skirt with belly panel... denim skirt. The end! And they're so ridiculously priced, too...
ReplyDeleteCan I just say you are my maternity alterations hero?!?
ReplyDeleteI am due in July but with twins, so I think I am in a similar stage as you size-wise. I just made my first maternity tee by tracing a t-shirt that I owned and doing the alterations for the belly. I too had the "ruffly bell effect" and wasn't thrilled with it - you have provided the fix! Thank you!
You look supercute in those tops. Great job, mama! I hope you have an easy third tri and smooth delivery. Also, if you haven't yet, you and hubby should look at shapeofamother.com (though NSFW), just so you have realistic expectations of the postpartum body.
Thanks June! I'm glad my bell fix was helpful!
ReplyDeleteYes, I have seen that site--it's definitely a bit sobering, but it's all worth it!