Showing posts with label tips. Show all posts

Wednesday, January 7, 2015

Fun with nerdy T-shirt transfers: Doctor Who, Funkadelic & Minecraft Tees and Onesies

TARDIS, Funkadelic & Minecraft Heart T-shirt transfer fun

Not sewing and not knitting, but I've been having fun embellishing some boring blank onesies and T-shirts with nerdy iron-on T-shirt transfers. These are the Avery dark fabric ink-jet transfers, as traditional iron-on ink-jet T-shirt transfers only work on white or very light-colored garments.

So far I've done:

  • A "Future Doctor" TARDIS design for baby, ironed onto a blank blue onesie I got for $1 at the thrift store. I found some TARDIS art online, traced it in Adobe Illustrator, then added text in Adobe PhotoShop. I didn't come up with this slogan, but it's about time we had a black Doctor Who, don't you think? (And depending on baby's sex, maybe a female one, who knows?)
  • A Funkadelic onesie for baby, ironed on to a purple and gray New Conceptions One-Hour Bodyshirt that I sewed for Z when I was pregnant with her. This was husband's request—I also made him a matching Funkadelic T-shirt that I couldn't find for the photograph.
  • A Minecraft-style pixel heart T-shirt for Ms. Z, ironed onto a knit T-shirt sewn for her by my mom (no pattern—my mom just takes some measurements and improvises her own patterns). This was my gamer husband's idea—they both LOVE Minecraft and play it together quite a bit.

Since each transfer sheet is a bit pricey, I didn't want to leave any white space, so I also squeezed in a bunch of other vector logos or icons that I haven't ironed on to anything yet: The Incredibles, Ghostbusters, The Clash, a bicycle, and Doctors Without Borders/Médecins Sans Frontières (MSF).

Fun w/ iron-on transfers: #doctorwho #TARDIS and Funkadelic onesies for baby. And more plans to liven up some plain second-hand baby clothes...

The results were pretty good, and they seem to be holding up after a few test washings. I had originally wanted to do freezer-paper stencils (I have SO much fabric paint that I've never used) because the effect is a little cooler... but they are a lot more work and I cannot for the life of me seem to apply the right thickness to prevent unseemly cracking on knit fabric.

Z was very excited and silly about her Minecraft pixel heart T, so much so I could not get a normal smile out of her for pictures:

Z in her Minecraft Pixel Heart transfer tee

Z in her Minecraft Pixel Heart transfer tee

Anyway, it's a fun way to do some quick embellishments without the time required for embroidery, appliqué or stenciling. The ironing only takes two minutes each.

A few tips, though: first, be careful to read the instructions for your transfers thoroughly. For light-colored T-shirt transfers, you generally need to reverse the artwork—not so with the dark ones. I wasted two sheets before I figured this out.

Second, be sure to wash and dry the shirt before wearing to set the transfer. I didn't do this when I took Z to an AIDS activist rally with Doctors Without Borders when she was one (we were protesting for the scaling up of the most effective treatments and making them more affordable and accessible worldwide to more patients), and she got water dribbles on her "TREAT AIDS = STOP THE VIRUS" shirt, and the transfer ink ran:

Mikhaela and Baby Z after the Doctors Without Borders AIDS rally last year.

What are your favorite embellishment techniques? Appliqué or embroidery are still tops for me, but these transfers are just so QUICK and EASY.

Monday, August 12, 2013

Tutorial: Super Quick No-Elastic Knit Half Circle Skirt!

Super Quick No-Elastic Knit Skirt Tutorial by Polka Dot Overload

This skirt was so quick and easy it barely deserved a blog post, but then I thought I'd try my hand at making a Pinterest-friendly tutorial illustration for it. It truly took me just 15 minutes to sew — it has just five seams, after all.

15-minute polka dot skirt

I wasn't going to hem it at all, but it initially turned out 4 inches too long and a bit dowdy.

Skirt back

So I decided to hem it with a twin needle ... and my walking foot really chomped on the hem. Then when I was trimming off the excess I managed to stab three additional holes in the hem and had to hand-sew them shut. So no hem closeups this time!

And yes, I know I'm a black-&-white-&-polka-dot broken record. But I have a lot of this black & white ITY jersey in my stash, and I had already drafted the half-circle skirt for this dress that I wear constantly, using Patty the Snug Bug's handy calculator.

McCall's 6070 polka dot dress

This no-elastic waistband treatment is pretty common in ready-to-wear skirts—it's kind of like a yoga pants waistband. The key is giving it just the right amount of negative ease, or it will sag and bag around your midriff.

If you do give it a try, please leave a comment, I'd love to see your version!

P.S. If you don't want to draft the skirt yourself, just use a purchased half-circle skirt pattern like the Cake Patterns Tiramisu instead of the self-drafted skirt! Even EASIER.

Wednesday, June 12, 2013

My 3 favorite sewing tools (that aren't actually sewing tools at all)


The non-sewing tool I couldn't sew without: an LED headlamp

Good thing you all can't watch me while I'm actually sewing. Because when I'm attacking a pattern I generally look less like this:

Vintage postcard image of woman sewing

And slightly more like this:

WPA poster: Pennsylvania miner
WPA poster from 1930s, click for more info

What can I say? I live in a poorly-lit NYC-sized apartment and I cut and sew on my dining table. A long time ago I did buy a lovely color-correcting Ottlite sewing lamp (similar to this desk one currently on 50% off sale), but I have no idea what happened to it.

And I don't need a light that sits in one spot—I need good sharp light EVERYWHERE when I'm, pressing, cutting, hand-sewing, embroidering and more.

So one day I got frustrated while trying to thread my serger (remember—always UNPLUG while threading and watch that KNIFE!), grabbed the LED headlight I use for camping...

And suddenly I, well, saw the light.

Now I always keep a headlamp in my little sewing cabinet and I'm fairly certain I swear at least 40% less while hemming, changing the presser foot or even unpicking dark stitches on dark fabric. Which brings me to:

My 3 favorite sewing tools that aren't sewing tools at all:

  1. A good LED headlamp with long battery life for shining light on tricky sewing tasks. I use this bright red one but sometimes borrow my husband's boring gray one (I think it has stronger light power).
  2. A roll of 1/2" double-sided mounting tape to use as a removable seam guide for even-width seams. (I can't use magnetic seam guides on my computerized machine).
  3. Ceramic cups and bowls for pattern weights. I learned this from my grandmother Melba who once laughed when she saw me slowly pinning my pattern and fabric together before cutting. (As my mom put it "She scorned the use of pins... a few upside coffee cups on the pattern were enough.")

    Of course you can buy nice colorful pattern weights or use big flat metal washers, but... I like my cups.

So: What's your favorite non-sewing sewing implement?

**Disclosure: Actions you take from some hyperlinks within this blog post may yield commissions for polkadotoverload.com (quite likely to be spent on more patterns, yarn or fabric for me to blog about!).

Thursday, May 9, 2013

Sweater Surgery Success (Or How To Tighten Up a Baggy Sweater... With Your Sewing Machine!)

Sewing Machine Sweater Surgery Tutorial: Before and After

I cut into my sweater with a big scary set of shears... and it lived to be worn again!

Few things are as terrifying for a knitter of delicate constitution as approaching a painstakingly handknit sweater with a sewing machine and a sharp pair of scissors. That delicate garment into which you've poured your knitting heart and soul—building it gently stitch by stitch over weeks, months, maybe years—could all unravel in a matter of moments if you muck it up.

Many knitters would rather frog the entire thing themselves and reknit it at a smaller size.

I am not one of those knitters.

Instead, I am here to tell you that Baggy Sweater Repair Surgery (BSRS) CAN be done—and to encourage you to make an attempt at refashioning before tossing your too-big knit (or using it for a car cozy).

DISCLAIMER: Polka Dot Overload is not in any way responsible for any sweater runs, tears, ravels or other yarn injuries, minor or major, that may result from the application of scissors or sewing machines to handknit garments.

Yes, I came. I saw. I altered a hand-knit sweater... by MACHINE (I'm serious, you can do that—Eunny Jang says so!). And here's how I did it:

Supplies & equipment used:

  • Unwearably baggy hand-knit sweater.
  • Sewing machine with zig-zag stitch function
  • Ballpoint needles for machine sewing
  • Thread to match sweater color
  • Thread in a contrast color for basting
  • Darning needle for hand basting
  • Sharp shears (I use these)
  • Pins

Step 1: Assess the Magnitude of the Problem. This is a somewhat risky surgical procedure, so I wouldn't necessarily advise performing it on a frequently worn sweater that is ALMOST perfect. It's probably best reserved for the most critical of unworn sweater cases.

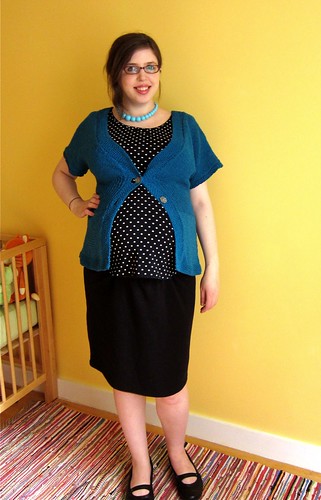
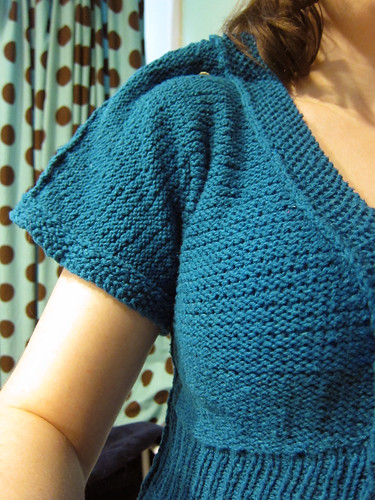
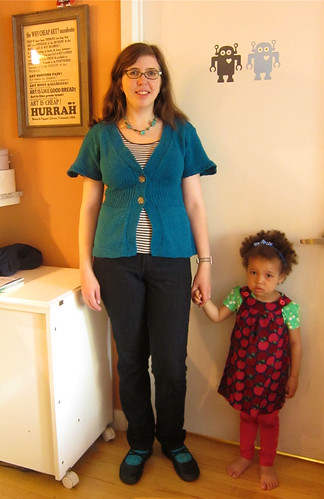
Now I originally knit my Flutter Sleeve Cardigan to the correct gauge in a size 36" bust (that's 2.5" of negative ease). However, because the yarn was a cotton-silk blend, it bagged and stretched over time, so it was even a bit too big back when I was pregnant:

Teal Flutter-Sleeve Cardigan remix (37 weeks pregnant)

Which means I haven't worn it in THREE YEARS. An ideal candidate! (Plus I needed it for Me-Made-May.)

Step 2: Pin Out the Excess Ease. I tried my sweater on, and determined that the biggest issue was in the length over the bust—it had stretched out there by about five inches. I put the sweater on inside out, and carefully pinned out the excess ease over my shoulders while looking in the mirror:

IMG_2294

I determined that I needed to take out about 5" total of length (seriously!) vertically, about 3" from the front shoulder and 2" from the back. I tapered this out to 0" at the end of my sleeves.

Note that some baggy, stretched-out sweaters may also warrant taking in at the sides (at the side seams if they exist, or by creating side seams if they don't). And baggy sweaters with set-in sleeves might even require removing the sleeves and sewing them back on—but be sure to secure with a few careful rounds of zig-zagging near any areas you plan to cut (zig-zag set to 0.5 mm width, 1.5 - 2 mm length).

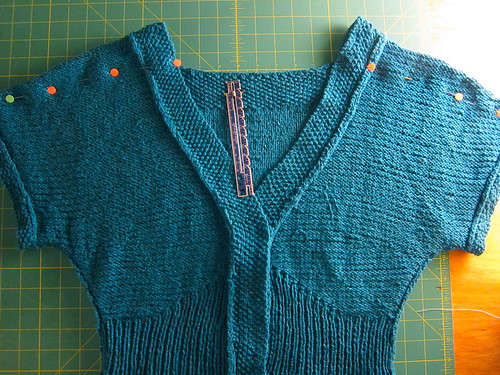
Step 3: Even Out Your Alterations. I laid my sweater down flat and carefully adjusted the pins on each side for symmetry:

IMG_2295

Step 4: Baste and Check Fit. There's really no going back once you sew into a handknit with a machine, so I wanted to make sure I was doing it right. Using white thread for contrast and a darning needle, I sewed a loose running stitch along the pin line, removed the pins and tried the sweater on again to be sure it fit (which it did!) At this point I also used my darning needle to close up the button holes quite a bit—they had stretched out so much the buttons were just falling out.

Step 5. Take a Deep Breath and Machine Sew it. VERY CAREFULLY. I sat down at my machine and very cautiously sewed a line of zig-zagging (0.5 mm zig-zag, with a 1.5 — 2 mm stitch length as recommended for sweater knits in my trusty copy of Sew Any Fabric) right next to my line of hand-basting stitches. Then I sewed a second line just for extra security. I made sure my stitches were well fixed at each edge, because even one unzig-zagged knit stitch could start a dropped stitch unraveling chain reaction of DOOM.

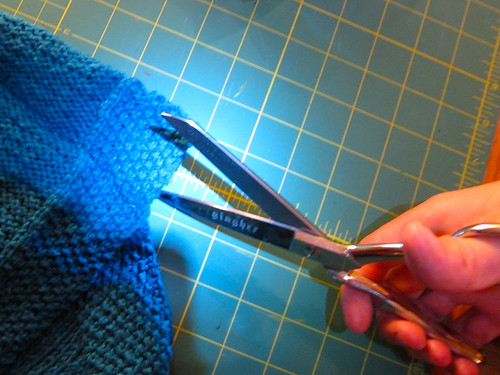
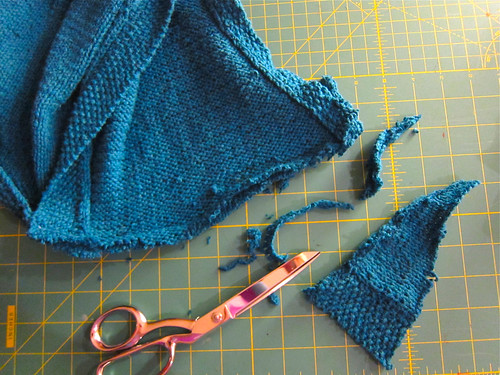
Step 6. Take an even DEEPER Breath and Cut Away the Excess. This part was hard. I kept checking and rechecking to make sure I wasn't cutting too close to the new seamline... EEEK:

IMG_2296

And then moments later, it was all over:

IMG_2298

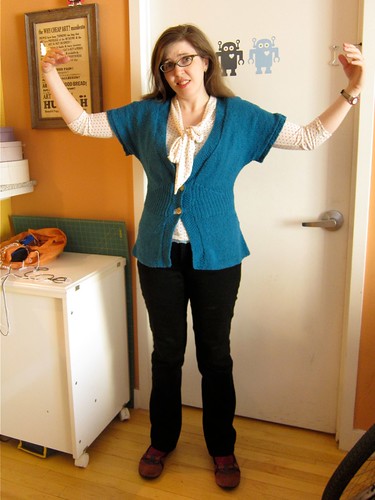
I'm happy to report the sweater patient is recovering well and is quite wearable now, though still a bit less snug than I prefer. (And I'm still recovering quite well from my own actual surgery, as you can probably guess from the steep increase in activity on this blog).

Me Made May 9: Cardigan Refashion!

I told you I was a RECKLESS sewist!

So tell me: would you ever sew and cut up a handknit — or would you rather reknit it from scratch?

Not-Goldilocks and the Three Sweaters, or How I Learned to Knit Something That Actually Fits

Mikhaela's Fitted Drop-Stitch Lace Tank

"The first sweater she knit was MUCH too small..."

Once upon a time there was a girl who learned to knit. First she knit some very wonky scarves, then some somewhat better hats, then a set of fingerless mitts or two. She started out with 99 cent Red Heart super saver acrylic and eventually graduated to cotton and then wool, and some of her creations started to actually be wearable by her friends and family.

For many years scarves and hats and baby sweaters made her happy, but one day the girl realized she was so very cold and no amount of scarves and hats would warm her and she couldn't wear those baby sweaters herself, cute as they were. What she really needed was a nice cozy sweater of her very own...

But the first sweater she knit (see top) was much too SMALL. "I can't breathe!" she declared, and into the charity donation pile it went.

Her second sweater was far too BIG. "I'm drowning in saggy baggy yarn!" she cried and into the refashioning pile it went:

Me Made May 4: Cardigan Refashion Needed

Eventually she learned a few lessons about ease and knitting and fiber choice and...

Her third sweater was JUST RIGHT.

My Spring Green Georgina Cardigan

And she lived happily ever after and never had any knitting fitting problems again! (Right? Right?)

So what's the magic secret to ensure a sweater you've labored and sweated over for months will actually fit when it's all blocked and sewn and finished up?

... Well, there isn't one. But I've learned over time there are a few ways you can give yourself a fighting chance!:

  1. Pay close attention to gauge -- and wash that gauge swatch the way you would the final sweater. I used to always skip that step out of impatience, but with my Georgina cardigan I did things right and actually washed and BLOCKED swatches of both stockinette and the lace pattern to be absolutely certain my gauge was right-on:

    Knitting progress
  2. Err slightly on the side of small. Negative ease is your friend. When I browse through finished sweaters on Ravelry, the number one issues I notice (and the main sweater issue my knitting friends seem to complain about) is too-baggy sweaters, like my second sweater above.

    If, like me, you like a nicely fitted curve-hugging sweater, you'll want to knit to final measurements at LEAST an inch or two (but probably a bit more) smaller than your actual bust and waist so that your sweater stretches to fit. You want to aim for this effect:

    And not this effect:

    With my successful sweater, I knit it with about 2-3" of negative ease. As I was going along, several people asked if it was meant to be for my daughter because it looked rather tiny, but after a good block, she was JUST RIGHT.

  3. That said, don't overcompensate for sizing issues. I made my first finished sweater (at top) from Stephanie Japel's excellent book Fitted Knits, which is chock full of great advice on, well, fitting your knits. (She also has a Craftsy class on fitting your knits, which I would suspect is excellent).

    BUT... when I started knitting and tried it on, it was a little bit too big. So I decreased. And decreased. And decreased some more as I went. And... Yeah, I seriously overdid it. So don't do that. You've been warned. Being able to breathe is a good thing.

  4. Choose a fiber with good recovery. Honestly, I think this was my biggest mistake with Sweater the First (knit in a cotton/tencel blend) and Sweater the Second (knit in a cotton/silk blend). Cotton and silk have very poor recovery and stretch and not so much elasticity and bag and sag over time.

    Even if you knit an in-the-round cotton sweater that you can try on as you go, it's not really a good predictor of how it will actually fit once you start wearing it. So they require extra fitting care and even more in the way of negative ease.

    Wool (and some of the nicer microfibers and acrylics if you must) on the other hand is plush and bouncy and springy and elastic. It tends to keep its shape and stretch with your body—but not too much. I've been wearing my Sweater the Third for weeks now, and it hasn't increased a bit in size. AMAZING.

    Note that this is NOT necessarily true of machine-washable aka superwash wools, which have had some of their little prickly bits smoothed off chemically to prevent felting. I've read that many of these bag and grow quite a bit after wash and wear. I'd rather handwash my sweaters than suffer another Sweater Size Tragedy, so non-superwash wools are it for me!

    (And for more on fiber and yarn choice, I cannot recommend Clara Parkes' fantastic book The Knitter's Book of Yarn: The Ultimate Guide to Choosing, Using, and Enjoying Yarn" highly enough.)

Phew! So what's your biggest knit fitting disaster?

Friday, June 29, 2012

Serger-Free Spandex (Mermaid) Skirt Sewing

BurdaStyle "Melissa" knit mermaid skirt

We never made it to the Coney Island Mermaid parade last weekend, but plenty of DIY sparkly spandex fun was had by all at Z's mermaid-themed birthday party on Sunday. Shockingly, I finished the toddler's mermaid skirt AHEAD of schedule (without using my serger OR a walking foot)...

Z showing off her mommy-made mermaid costume

And somehow found time to whip up a skirt for myself. Not to mention hair accessories for me, Z and Z's cousin T who was visiting for the weekend. T is nine, so she was actually able to help me--she drew and cut out the stars for the headbands, turned them inside out, and stuffed them, all very carefully. We had so much fun collaborating, and it got me excited for that far-off day when Z can actually be trusted in the sewing area.

T cuts out her mermaid headband

The results were fabulous:

Z and T, with their mermaid headbands and dresses

As for the details:

Serger-Free Spandex Sewing

My original plan was to do the smart thing and serge this super-stretchy stuff with wooly nylon. But if I had had to pull the serger out of the chest and set it up every time I wanted to sew... none of these things would ever have been finished.

So I used the same method my mom used when she made swimsuits for me as a kid--just zig-zag it. I lowered the presser-foot pressure to 2, and sewed everything with a medium-width zig-zag stitch using a size 90 stretch needle. The fabric was so heavy there was no rippling or waving like you get with delicate rayon or cotton knits. EASY. (And seriously--if you don't have a serger, there is no reason to fear knits!)

And I didn't bother overcasting or hemming, but I did reinforce the bottom of the split seam and side opening areas.
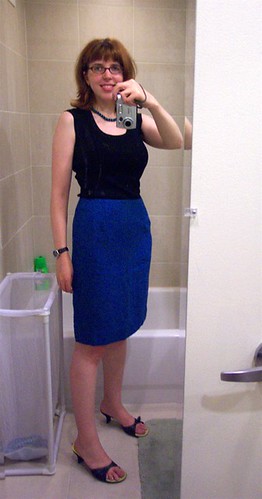
My Melissa Mermaid Skirt

This quick knit skirt came together in like, an hour, including the cutting. You might even call it a TNT pattern--except last time I made it I was pregnant and cut a larger size.

Mermaids posing out...
  • Pattern:BurdaStyle Melissa knit pencil skirt with high-waisted yoke band--no elastic necessary! Seriously, it's just three pieces, and I didn't even bother hemming this one.
  • Size: I cut a 38 and it worked just peachy (note that my weight seems to be fluctuating again--I'm currently at a 29" waist and 38.5" hip)
  • Fabric: Thick, sweaty, glittery fish-scaly spandex from Spandex House for the skirt--I think it was $10/yard. And shimmery metallic spandex in a contrasting color for the yoke/waistband.
  • Alterations: I just made it longer, but only sewed it down to the knee, for ease of walking.
  • Wear to: My daughter's birthday party. Other occasions may be more challenging.

Z's Split Mermaid Skirt

Trying to get Z to take this thing off after the party was NOT fun.

Z and T, with their mermaid headbands and dresses

I started out with this excellent mermaid tutorial from ikatbag (thanks to commenter June for the tip!), but was worried it would be tough to run around in. So I tapered the skirt pieces to points, turned them sideways, and added ruffles (see above photo for the latter).

Mermaid costume in progress

The fabric is mostly the same, except I used a sequined net for the side ruffles and a very soft rayon knit from my stash for the waistband to protect Z's sensitive eczema-prone skin from direct metallic spandex contact.

This one does have elastic in the waistband--she doesn't have much difference between her waist and hip measurement, so anything that helps keep her clothes up is necessary.

Mermaid Headbands and Hairclip

Z in her starfish mermaid headband

These are just a folded strip of the metallic spandex (2" less than the head circumference) sewn into a tube, with a stuffed spandex star handsewn on. DONE.

I also sewed a bunch of random bits of fabrics to a hairclip for myself--here's a detail view:

Mermaid hair accessory detail

Finally, here's the three of us under the ocean at Z's party. The fabrics and shell trims that didn't make it into our costumes were strewn about the room for ambiance and suchlike--no idea how else I'll use them.

Three mermaids under the sea

So: do you ever sew knits without a serger, even if you have one?

Oh, and next up... sewing something, like, wearable. To work and stuff. And a cardigan blocking update!

P.S. I almost forgot--we weren't the ONLY mermaids at the party!

Tuesday, March 20, 2012

5 Magic Awesome Reasons to Sew With Wool! (+ 2 Ways to Wash It)

Wool: sexy, hypnotic and magical! Don't be scared!

So last night I was leisurely handwashing the soft, blue and luscious Christian Dior doubleknit wool fabric I'm using for my Mad Men Challenge dress in a basin of tepid water and Eucalan...

Christian Dior blue wool doubleknit

And as I squeezed it very gently with my hands, that delicious lanolin smell wafted up to my nostrils and I thought: "Wow! I can't believe I ever was afraid of wool!"

In fact, before I started knitting with better-quality soft merino wools (thanks to the inspiring words of Elizabeth Zimmerman and The Yarn Harlot), I not only feared handwashing wool garments, I thought I was actually allergic to the stuff.* I even sought out acrylic and cotton yarns OVER wool. For real!

So in case you are still struggling with wool-o-phobia, I present (in random, arbitrary, unscientific fashion):

5 Reasons I Love Working With Wool

  1. It keeps you warm but lets your skin breathe.
  2. It resists odors, stains and bacteria, and rarely needs cleaning.
  3. Wool kicks water to the curb and keeps you toasty and dry, absorbing up to 30 percent of its weight in water before even feeling wet. This is why I wear wool socks almost every day (except in the summer).

    Mikhaela's Mixed Up Monkey Socks
  4. It comes in gazillions of beautiful colors and weights and styles to suit any taste. Slinky sexy soft merino wool jerseys, nubbly gorgeous sturdy tweeds and plaids, thin tropical wools, flattering drapey crepes...
  5. It has amazing springiness and recovery and takes fabulously to pressing and steaming and shaping and fitting and tailoring (see Joan photo at top--do you think cotton can do that? I don't think so!)

Bonus Reasons For Crafty Mamas to Love Wool

  1. Wool makes baby pee vanish. Like magic! Wool diaper soakers make the best cloth diaper covers because the lanolin in the wool does some weird tricky thing that actually just makes the urine go away as it dries. Really! (Not that I'm going to let Z pee on my Mad Men dress, mind you.) When Z was a newborn, I used the awesome and quick Sheepy Soaker pattern to make the below:

    IMG_4656
  2. Wool fights embarrassing breastmilk leaks. I ONLY wear merino wool nursing pads (which I could have made easily, but bought--mine are LanaCare and OnGuard brands). I have a few pairs, and one dries while the other is in use. They are soft, warm, absorbent and dry, fight bacteria and don't feel cold and clammy, and can be easily handwashed as necessary.

2 Ways to Wash Wool

  1. Handwash with gentle wool wash and tepid water. I use this method for all handknits and all my wool sweaters and wool knit tops. It's SO easy. Seriously. Just: fill a basin with tepid water, add a dash of wool wash (the real gentle lanolin-containing kind, like Eucalan, not Woolite or any harsh chemical ones) gently squeeze through, let soak 15 minutes, roll gently in a towel to remove excess water, lay flat to dry. DONE. No rinsing required!
  2. Pam's Dry-Clean-free Fast & Easy pre-treatment method. I haven't tried this yet, but many sewists swear by it, and I love that no dry cleaner is required! Though I'm not clear on whether occasional dry-cleaning would still be required once a garment is actually worn--my guess is yes.

And as they used to say on Reading Rainbow, don't just take my word for it!

Nothing beats wool. It's an extraordinary material—annually renewable and recyclable—with infinite potential. It can be wispy and sensual when it wants to be, it can be gruff and powerful, it can put out fires and keep families warm at night, it can be stepped on, sat under, rained on, and wrapped up in again and again.
--Clara Parkes, author of The Knitter's Book of Wool

So: do you fear--or embrace--wool? And why? What's your favorite source for buying wool fabric?

*Mohair, on the other hand--that stuff turns my skin bright red in SECONDS. Yowch!

Monday, March 12, 2012

Mad Men: Joan Hair How To (+ How Done Up Do You Get for Garment Photos?)

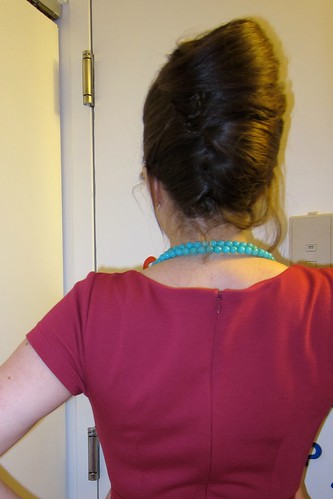
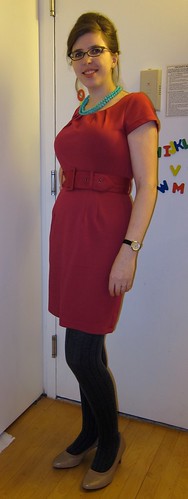
Joanie hair test for Mad Men Challenge

Teased-up 1960s hair: Yay or nay? (P.S. Yes, no amount of bobby pins could keep my hair from escaping this French twist)(P.P.S. No, I didn't sew this--it's just a vaguely 60s-ish contemporary doubleknit dress I thrifted recently)

Fellow sewists, some questions for you:

  • Does vintage sewing require vintage hairstyling? Do 60s hair and 60s dresses pair like a fine wine and cheese--or a Halloween costume?
  • How done up do you get for finished garment photos? Do you fancy yourself up with coordinating hair, makeup and accessories before staging an elaborate photo shoot on a weather-beaten bridge? Or do you throw your garment on fresh from the sewing table and snap a few quick pix with your camera phone, styling and scenery be damned?
  • Can you explain to me why what I thought was quite a chic and sophisticated vintage-style updo caused my husband to burst out laughing and use words like "outdated," "older" and "like my elementary school principal"? [Edited to add: Also, "Marge Simpson."]

Last time I attempted to learn to vintage up my hair, the underwhelming results (see "Wet Set Woes") so traumatized me that it took me two years to get up the courage to try again.

But I have finally regained my hair experimentation bravery, with the help of some of the Youtube video tutorials by Lisa Fremont-Street, Strawberry Koi Vintage and more that my readers so kindly recommended at the time.

I finally achieved curling success with a combo of LottaBody, water and overnight pillow curlers--I styled the results into a 1940s pageboy (which my husband LOVED, fyi) that lasted several days.

But I digress!

Joanie hair test for Mad Men Challenge

OK all you wiggly-dressed Mad Men Challenge-ers, here's...

How to Get a Joan Holloway-ish Updo Look:

The tools

  1. Rat-tail comb.
  2. Bobby pins in mind-boggling quantities.
  3. Hair pins—a lifetime's supply.
  4. Hair spray with a death grip hold.

Joanie hair test for Mad Men Challenge

The steps

  1. Use rat-tail comb to tease all hair from ends to roots, starting at the crown of the head, and working in small sections--result should resemble demented hair haystack.
  2. Smooth outside layer and begin shaping, pulling over to side back of head and securing with---
  3. Oh who am I kidding?
  4. Cry in frustration because you have no idea what you're doing, give up and ask an expert hairstylist for help.

Anyway, yeah. This was way beyond my rudimentary skill level. So I went to see Ricky at Avalon Salon on 112 Christopher St. He's awesome, and has been doing my hair (when I remember to drag myself into the salon every 3-4 months) since 2004.

Joanie hair test for Mad Men Challenge

He did show me how to do it step by step, but I'm not sure if I'll be able to get it right when I complete my dress.

As for me, re: getting done up or fancy.. I started out photographing my sewing projects for Pattern Review bathroom-mirror style, as you can see with this lovely wool skirt circa 2005...

Blue Wool Tweed Pencil Skirt (sewn from Sew Fast, Sew East computer fit pattern)

And now I have a tripod and self-timer, and try to at least brush my hair and put on makeup and cute shoes and cheap costume jewelry. I'll admit that the exciting photographic antics of the Sew Weekly crowd (I'm looking at you, Oona and Kazzthespazz) sometimes make me feel ashamed of my boring apartment wall backgrounds.

Joanie hair test for Mad Men Challenge

But in my defense--I've got a toddler who can't be trusted not to run amuck while I'm messing with a tripod in a park.

So--what's your take? 60s hair yay or nay? Basic garment pix or fancy photo shoots?

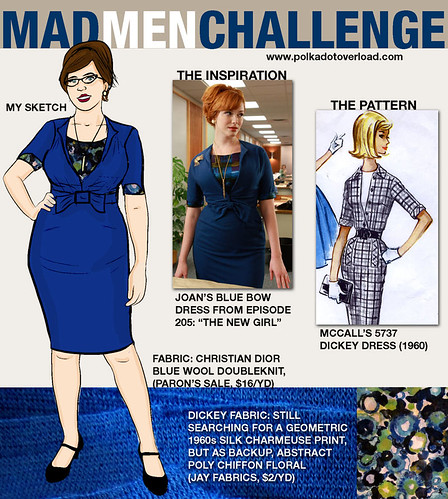
P.S. To recap--here's the sketch:

Mad Men Sewing Challenge Sketch: Joan Dress

Tuesday, January 24, 2012

The ABC Toddler Tea Table (IKEA Hack by My Amazing Mom)

There's been a whole lot of sewing and knitting going on over here... I counted it all up and realized I'm currently super actively working on a pair of trousers, some toddler overalls, a Colette dress, a vintage Du Barry dress (more on that later—super exciting!), a hooded sweater AND a pair of mitered mittens... all in a sparse 1 - 2 hours per day. Now that I'm back into the making of things, I AM OBSESSED. Er... this is a familiar feeling.

Sadly, I have no finished objects to photograph this month—yet. But I do have a fabulous IKEA hack to show you, courteous of my amazing mom (last seen helping to solve a vintage sewing genealogy mystery at My Happy Sewing Place).

It started life as a $19.99 unfinished IKEA Lätt set. Little Ms. Z loved nothing better than sitting at her table and coloring with her crayons or partaking of imaginary tea:

It was unfinished and a little boring, so my parents took it home with them to give it a makeover, leaving Z the table my dad built for me and my brother when we were kids in the meantime. My mom stuck down some sticky foam letters and shapes she had lying around...

Then she spraypainted the Lätt red, creating an awesome relief effect (we're letting it air-dry for a while before Z gets it back, though, as I'm not sure of the paint's VOC levels). And she sewed little pockets for the chair backs for Z to keep her crayons in. Voila!

Oh, and just for fun, my mom also made some snow globes featuring photos of Z in the Tea Party dress I made for her—I believe glitter, glycerine and some cheap jars and vases from Michael's were involved:

P.S. Even if you're exclusively a sewer and not yarn-inclined, you might relate to this post by the Yarn Harlot on startitis and its aftermath.

LinkWithin

Related Posts Plugin for WordPress, Blogger...