Showing posts with label croquis. Show all posts

Wednesday, April 17, 2013

Spring Sewing Sketch (With Lots of Cake!)

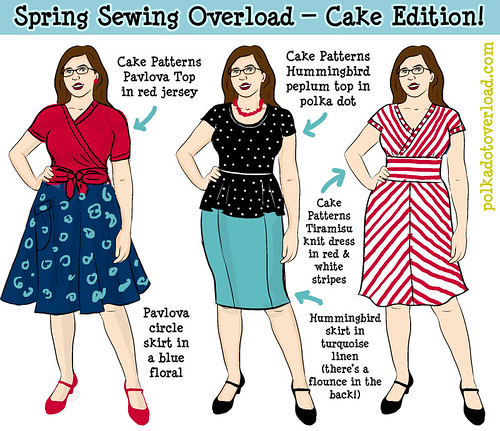
Spring Sewing Sketch 2013 — Cake Patterns Edition

I've had so much fun doing the cover illustrations for StephC's Cake Patterns, and now that I'm feeling better, I can't wait to actually sew them for myself! Shown are Pavlova wrap top & circle skirt, Hummingbird peplum knit top and pencil skirt with back flounce, Tiramisu surplice knit dress with chevron stripes.

(Edited to add note: As I may have mentioned, my husband and I are from Massachusetts—he's from Boston proper. So people of Boston—friends, family and otherwise—you are in our thoughts and our non-religious equivalent of prayers.)

This past weekend I woke up and realized that for the first time since my daughter and I got sick (her with severe asthma/eczema/severe allergies, me with a never-ending serious sinus infection) back in August, I no longer felt overwhelmingly tired and ill and miserable. Wow! I felt like Dorothy in the Wizard of Oz, stepping out of her black & white farmhouse into the Technicolor land of Oz.

Instead of every little thing being an effort, I was buzzing with thoughts and ideas and excitement and imagination and just, well, JOY. I had a lovely time at the Colette Patterns party at Brooklyn General (pictures later, I need to get to bed!) on Saturday, and on Sunday I dug through my pattern and fabric stash for inspiration.

So now I am really itching to SEW full steam ahead ... but:

I've been busy dealing with a closet moth infestation of epic proportions AND I have had to send both my sewing machine and serger to the shop for a tune-up. BOTH of them! Ugh!

So in the meantime I am comforting myself with my second-favorite sewing-related pasttime, sketching! I whipped up a little sketch using my croquis of how I might look in the three Cake Patterns out so far, and I'm hoping to get Tiramisu cut out while my machines are at the sewing doctor.

The Hummingbird and Tiramisu sketches are based on stash fabric... I'm going to try and sew Pavlova from the stash as well but I have to make sure I have the right fabric for the job.

I do have a huge sewing queue of so many different patterns, but I really want to start with Cake as I really want to bring my drawings to life... plus, have you seen the delicious Tiramisus and Pavlovas other people have been sewing? Seriously.

Which would you sew first? The dress or the peplum top? Or one of the skirts? I really need some summery skirts right now... but I LIVE in dresses...

Wednesday, February 15, 2012

Sew Grateful Project: Crazy for Color Blocking Wool Jersey Skirt

Sew-Grateful-Crazy-for-Colorblocking-Skirt

I love this skirt so much you'd never guess it sent me into fits of serger-thread-unpicking crying and rage!

Yesterday morning I was ready to cry, but by the evening I was ready to dance. The "quick and easy" knit skirt I had turned to as a break from my troubled trousers and daunting vintage dress was turning into a disaster--the skirt was too short, the waist was too tight, and despite my best interfacing and stabilizing efforts the rippled top-stitching around the elastic casing looked like it'd been done in a drunken Etch-a-Sketch contest:

Sew Grateful Crazy for Colorblocking Skirt in progress

But after a lovely and relaxing lunchtime knitting group session at work, a happy idea came to me--why not just slice off the waistband casing altogether, and replace it with a gigantic soft black elastic waistband? It just so happened that I had recently thrifted a way-too-short skirt with just such a waistband:

Sew Grateful Crazy for Colorblocking Skirt in progress

Instantly the clouds lifted, birds sang, and all was right with the world! A quick bit of waistband transplant surgery and rolled hemming later, and... I had a skirt! I wore it to work today and couldn't help but blurting out "I made this!" at random moments (though I got quite a few unsolicited compliments as well). Know the feeling?

Inspiration:

Sew Grateful week is technically over, but my main inspiration was my grandmother Melba, who taught me how to serge and inspired me to take my sewing to the next level. Grandmommy could whip up complicated lined suits and fancy silk bridal gowns... but as a busy working mother of four she LOVED shortcuts, knits and quick, easy patterns. Not to mention bright colors:

Melba in a simple orange knit dress, with newborn Mikhaela, 1980. Recognize that color?

Kwik Sew patterns were her favorite, mostly because they were printed on sturdy white paper. And when she died in 2004 (see my tribute cartoon here), she left me her Kenmore serger and a number of her uncut Kwik Sew patterns, including this one.

Also: I'd been meaning to try colorblocking for a while now, and this eight-gored skirt seemed like a perfect opportunity, since the pattern is otherwise a bit boring.

Crazy for Colorblocking

The sketch: This is a good illustration of how helpful a digital croquis can be!

8-Gored Skirt 7 Colorblocked Ways

The pattern: Kwik Sew 2771, a so-simple-it's-embarrassing 8-gore knit skirt with elastic waistband. It's literally just one pattern piece. How I nearly screwed it up so badly I have no idea!

More photos:

Side view, featuring my photo shoot assistant:

Sew Grateful Crazy for Colorblocking Skirt

Back view, sort of:

Sew Grateful Crazy for Colorblocking Skirt

Pattern Description:

Skirt with eight gores. Yeah, that's it! It's practically a maternity skirt it's so basic (and with the waistband treatment I went with tugged up to empire height or down below the belly it could totally be one someday).

Pattern Sizing:

XS-XL. I made the medium based on my measurements--but with jersey this tissue-thin, I should have made the XL (or even larger) and gathered the extra fabric. It's a bit skimpy as is. And I found the recommended elastic width for my waist size to be uncomfortably tight.

Did it look like the photo/drawing on the pattern envelope once you were done sewing with it? Yes, but awesomer and colorblockier.

Were the instructions easy to follow? There are like, three steps. So, yes. Except I still managed to serge some seams together on the outside (SOOO much unpicking) and I found the elastic-insertion method--sewing the elastic together and THEN topstitching the casing over it--to be ridiculous and finicky.

What did you particularly like or dislike about the pattern?

It's simple and fun--you really can't go wrong.

Fabric Used: Wool wool wool--I love wool, and I've always wanted to own a wool jersey skirt!

Except I didn't have the cash to buy the real thing in four colors. So this is just super-lightweight wool/poly-blend jersey from Fashion Fabrics Club--about 1 1/2 yards total at $7.50/yard. The descriptions and fiber content of these four colors would lead you to believe these are all the same exact thing, but buyer beware! They all feel totally different--the navy is super-soft and super-tissue-thin and sheer. The royal blue is lovely and smooth, though you can definitely tell it's half-polyester. The teal and seafoam are full of little white hairs poking out all over the place--my husband was convinced they had been sat on by an army of cats:

Sew Grateful Crazy for Colorblocking Skirt in progress Sew Grateful Crazy for Colorblocking Skirt in progress

The takeaway here: when an online fabric description says "blouse weight"--don't just hope it's a lie because you are too cheap to buy real proper weight fancy wool jersey.

Construction notes:

  • I was too lazy to change my serger thread, so the inner seams are done in light yellow thread. Which kind of shows through the thin fabric. OOOPS.
  • I was going to do a twin-needle hem (for a nice weighted hang) with the help of a little stabilizer and/or interfacing, but after my struggle with the waistband, I just did a rolled hem in black thread and wooly nylon, which goes nicely with the soft black elastic waistband.

Successes:

  • First time using wool jersey--well, woolish jersey anyway.
  • It is wearable.
  • It is colorful.
  • I'm loving the waistband--feels like a nice soft belt. A lot of people mistook this for a dress today, what with the coordinating knit top (from Target, in case you care).

Room for improvement?:

  • This would be more awesome in every way in a heavier 100% wool jersey.
  • Or I could try and recut a fuller version or add some extra gores to this one... but I'm so unlikely to do that.
  • I had serious static cling problems all day--this skirt and my tights just LOVED each other. Any tips to avoid that?

Would you sew it again? Would you recommend it to others? I definitely recommend it, but I don't think I need more than one of these.

Conclusion: My grandmother Melba would have loved this skirt. And my daughter Z is really lucky to have three wonderful and doting great grandmothers, but it really makes me sad that Melba never got to meet her.

Bonus Valentine's Day photos: When I got home from work, this was waiting for me:

IMG_8865

Although I loved the flowers, my favorite element was the little paper toy "I LOVE YOU" robot my husband had assembled during Z's naptime (free printable pattern here):

IMG_8867

We had a lovely dinner for three--Masheka and I had sushi and wine and little Z had chicken and green beans.

Good night, all!

Sew Grateful Crazy for Colorblocking Skirt

Thursday, January 26, 2012

1940s Red Dress Showdown (Du Barry Edition): Sweetheart vs. Peplum?

1940s Du Barry Dress Showdown Enevelope Illustration with my croquis

I totally went back in time to 1942 and posed for some Du Barry pattern envelope illustrations!

Vintage lovers, I have the most exciting news for you! I HAVE BENT THE FABRIC OF THE SPACE-TIME CONTINUUM... all in the name of sewing, of course.

The idea came to me when I showed my husband the below two vintage pattern envelopes and asked him which dress would be more sexy and adorable for our upcoming Valentine's Day date.

"Sorry babe," he said, "It's really hard to tell—those illustration models are way too bony!" (Apologies to the more slender among you--this is his husbandly way of saying "honey, you look great the way you are", and I won't pretend I don't love it.)

So I tinkered around with some presser feet, rick rack and stretch lace for a bit, cobbled together a workable time-travel device, and paid a visit to the Du Barry pattern studios. I was like "Guys, all your super-stylized illustrations make it hard for the not-totally-waspwaisted among us way-in-the-future seamsters/seamstresses to picture how a dress will look on our actual bodies" and they were like "Wow, that's an excellent point."

Sadly I lost the device on my journey home, but c'est la vie! Anyway, the dress pros and cons:

Du Barry 5525 (early 1940s?):

  • Pros: Sweetheart neckline, reverse sweetheart fitted hip yoke, beautiful drapey skirt.
  • Cons:Will require grading up a size, something I've never attempted. And the sweetheart isn't as low-cut as I'd like. Also, I'm totally nervous about attempting 40s shoulder pads for the first time--I have really narrow shoulders!

Du Barry 5505 (1942):

  • Pros: Love the princess seams, love the skirt gores, LOVE THE PEPLUM. Also, no grading--just a little tweaking of fit and my usual major FBA.
  • Cons: Neckline super high, not very sexy. I tried to mitigate this in my croquis sketch by colorblocking and making the sleeves into cap sleeves, but not sure if it worked.

I did play with some other color options, but red clearly won the day:

1940s Du 1940s Du Barry Dress ShBarry Dress Showdown Alternative Color Options

For fabric, I went a-swatching at my favorite Garment District store, Paron's:

Fabric swatches for vintage 40s dress

They were having a store-wide 30-60% off sale, so I didn't limit myself to the half-off annex this time. My options were (clockwise starting with the purple):

  1. Purple rayon crepe. (Not red, but it was the only rayon crepe in the annex).
  2. Christian Dior red rayon/silk blend. Really nice but a bit orange-y in real life (and this is the rare case where I didn't want orange.
  3. Deep red silk crepe with a hint of stretch.
  4. Lovely soft thin 100% wool crepe.
  5. Lovely soft thick wool/nylon/stretch blend crepe.

The wool/nylon/stretch was my initial favorite—I just love working with wool, whether sewing or knitting—and would have been perfect for the bodice... but it was too thick and didn't have enough drape for the skirt. I went back the next day to get the red silk crepe stretch mainly because it looked so awesome when I stood in front of a mirror trying to pretend the bolt was a real dress.

And there you have it. So: who wins the showdown? Which dress would YOU make? I've already chosen, but I'm not telling—yet.

P.S. This is a case where a croquis really comes in handy, as I demonstrated recently in my little "How to Dress Your Digital Dress Form" demo/tutorial video (see related blog post for references, tips and details):

Monday, January 23, 2012

Video Tutorial: Try On Patterns Before You Sew With a Digital Dress Form (Croquis)

Here it is, folks—my long-promised video tutorial on how I dress my digital croquis, based on my Colette Pastille vs. Colette Macaron sheath dress showdown! It's just three minutes long, so please take a look and share with your friends, embed on your own blog, whatever!

If you have any questions about a specific part of the video, leave them in the comments and I'll answer them in annotations directly on the video.

Now that I watch it critically, perhaps it's more of a "demo" than a tutorial, as it doesn't really go into the real nitty-gritty—what size paintbrushes to use, how to do a proper selection for filling, how to use layers, or how to create repeat fabric patterns, etc. Do you need to know that stuff too?

So I'd really love your feedback:

  • How's my genereal script/approach/use of images/video?
  • Is it too long/too short?
  • Is my narration understandable, or too fast/mumbly?
  • Are there some bits you're more interested in than others?
  • Should I do more of these? The other tutorial I've been promising to do for about two years now is how to create a really robust digital croquis in the first place using a variety of methods—digital, hand, etc.
  • Would it be better as a series of printable photos and text than a video?

The details: I captured the demo with iShowU, and edited it and recorded the voiceover in iMovie. I found the voiceover the most challenging part—at first I tried to wing it, but I kept stumbling over my words so my film-school-grad husband suggested I script it. Here's my rough script with some notes/links:

Mikhaela Reid here from Polka Dot Overload with a demo of how I “try on” sewing patterns using my customized digital dress form, or croquis.

With a little practice, you can plan your sewing wardrobe, design fun details and play with palettes and fabrics. Best of all, you can preview how a design will look on YOUR awesome shape before you cut—or even buy—your pattern or fabric. This is particularly great for use with vintage patterns with really stylized envelope drawings.

Back when I was super pregnant, I used my croquis to create storyboards and plan extensive modifications to non-maternity patterns.

So let’s talk tools:

  • First, you need a croquis. This could be one you traced by hand and scanned or drew directly into the computer. (Tutorial forthcoming, I swear!)
  • You’ll need images of your planned fabric, whether you’ve already purchased it or not. I keep all my fabric stash photos catalogued by color and type in Flickr, because I am obsessive.
  • A pressure-sensitive graphics tablet is optional—but I can't recommend it highly enough. Drawing with a mouse is clumsy and awkward, like drawing with a bar of soap—a pen tablet lets you draw naturally and create thicks and thins that look brush or pen-drawn just by changing pressure. I use a Wacom Intuos, but you can get a small Wacom Bamboo for $77 new, and I've seen used Bamboos or Graphires go for as little as $20 on eBay—less than the cost of some presser feet. Don't worry about size—even the smallest one can do what you need for this.
  • Finally, you’ll need digital image-manipulation software with the ability to paint and use layers and patterns. I use Manga Studio (speciality software for cartoonists—you don't really need it, I just happen to be really comfortable in it) and PhotoShop (just don't have TOO much fun with it) but GIMP is a great open-source PhotoShop alternative that does most of what PhotoShop can do for the excellent price of FREE GRATIS.

So let’s get started. I’m going to speed this up, but the entire process usually takes me from 15 minutes to an hour—drawing and coloring these two dresses took about 20 minutes total.

Here’s a grayed out photo of me in a tank top on which I’d already drawn my croquis on another layer. For reference, I’ve pulled up the pattern flats for the Colette Macaron and a photo of Mena from the Sew Weekly wearing her lovely version.

I usually start with one of the key lines of the design, in this case the mock sweetheart neckline. I keep the fabric in mind—is it stiff? soft? stretchy—and how it will hang from my body in real life. It wouldn’t be realistic to draw lots of soft pleats or folds in a stiff fabric with no drape. I also think carefully about ease. In this case I’m working with a firm cotton stretch woven and I plan to make the dress very fitted, so I draw the outlines very close to my actual contours...

And then I ran out of patience and winged the rest of it. And if you listen, you'll see I had to edit out a lot of the above for time's sake, too.

Recommended reading: If you're interested in a good reference book on how to render garment details...

  • Fashion school textbooks like Fashion Sketchbook (which I bought used at the FIT bookstore) or 9 Heads are excellent but extremely expensive.
  • Fantastic Fit For Every Body has a great section on drawing your own croquis, whether you're an artist or not!
  • Also, remember, that they're teaching you to render the unrealistic and superstylized 9-heads-or-more-tall fashion figure—which is the opposite of what we're trying to do here with our custom-made-for-our-awesome-real-bodies croquis.

    But really, the best thing is just to study real clothing and fabric, and practice, practice, practice. I love these sketches Lladybird has been doing with her croquis by hand, and she claims she's "no artist", just "pretty good at copying stuff."

Enjoy! I'm dying to know what you all think of this—please let me know. And if this tutorial/demo inspires you or helps you in your sewing planning adventures, please leave a comment with a link to your projects so I can see them.

Tuesday, January 10, 2012

Let's Play: Sheath Dress Showdown! (Colette Edition)

Sheath Dress Faceoff Sketch

Readers, sometimes sewing just isn't ... FUN. And that is unacceptable. Considering how limited my sewing time is, I just can't afford to feel like I'm taking my sewing medicine or paying my sewing dues or gritting my sewing teeth. I need to be having a party at the sewing machine, a cut-up at the cutting table, so lost in what I'm doing that the time flies by and I look forward to each step.

And for me, fun generally involves bright fabric with a bold print.

So whilst waiting for petersham and zipper for my trousers to arrive in the mail, I pulled this fabulous stretch cotton (acquired ages ago at Mood) from the stash:

Ink paint turquoise stretch cotton

What a hot number, am I right? All my patterns want to ask her out! But I only have two yards, so I had all my sheath dress patterns do a little strut down the fashion runway of my mind... The top two you can see in my sketch above--Colette Pastille and Colette Macaron.

The other contenders:

Vintage McCall's 5955 Slim keyhole dress

Vintage McCall's 5955.

  • Pro: Love the keyhole!
  • Con: Neckline too prim, could lead to dreaded uniboob look.

Vintage Simplicity 3045 Slenderette Dress

Vintage Simplicity 3045 Slenderette (1959), view 2.

  • Pro: Hello sexy scallops!
  • Con: I fear the belly pleats.

Vogue 8280

The ever-popular Roland Mouret Vogue 8280.

  • Pro: Such an awesome shape.
  • Con: Print may overwhelm detailing.

Vogue 9668

Vogue 9668, bodice from first view and skirt from the second.

  • Pro: I have wanted to make this pattern from FOREVER. One of the first in the stash.
  • Con: I think this pattern prefers drapey rayon.

So I was leaning strongly towards Pastille because I think that fitted carved-out shape (minus pleating) is perfect for this fabric, maybe with a nice black belt... and my husband was really excited for me to use the book since he bought it for me.

Also, looking at my croquis sketch I have my doubts about how Macaron will look on me--it has similar fearful belly pleats as the vintage pattern above.

But then I realized my yardage is only 48" wide, which actually eliminates ALL of the options. Except Macaron. I have some Fabric.com black swiss dot in the stash for the yoke. Likely the same type of Fabric.com swiss dot The Sew Weekly's Mena Trott used in this Macaron, although I do worry about mixing stretch and non-stretch wovens... we shall see. Anyway:

Macaron wins by default!

Tuesday, December 27, 2011

The family croquis: new digital dress forms of me, hubby and baby

Aren't we an adorable family of digital dress forms? Click to enlarge!

I have all kinds of sewing projects (for myself and the little one) in the works, plus a finished object or two to review... but first I had to share a sneak peek at the new digital dress forms I created of my family last night after my toddler went to bed.

A long time ago and far far away I promised to put together a tutorial on how to create and use a digital croquis (beyond just: "photograph yourself, trace it, sketch over it.") I'm not sure when/if I'll get a chance to write one to my original level of intention, but at some point I will share some step-by-step photos of the process and hope you all get something out of it.

The first things I intend to sketch on these new dress forms are wide-legged high-waisted trousers for myself, and a pair of piped overalls for baby girl.

Hope you all had a wonderful holiday weekend!

Sunday, April 25, 2010

Polka Dot Crush: New Vintage Lady!

The New Vintage Lady shows off her handmade gardenias, Billie-Holiday-style

Reverse-inspired by the Selfish Seamstress and her sinister parade of nemeses, I thought I'd write an occasional sappy mash note to my favorite stitchy bloggers. First up: New Vintage Lady (aka Shelley J.)

I first e-encountered New Vintage Lady a few weeks ago via Sew Retro, but I had an instant blog crush, with a bit of jealousy mixed in. Firstly, in my biased cartoonist-girl book:

The Lady can DRAW! Which makes sense, since she's an animator by trade. (And as someone whose drawings don't move, animators totally make me green.)

You might have noticed that most vintage pattern envelope illustrations--even for plus-size or maternity patterns--have one thing in common: skinny, wasp-waisted white ladies. Not so New Vintage Lady's line of plus-sized reproduction patterns, which she recently began illustrating with gorgeous variations on her cartoon self-portrait (click any of these to enlarge):

And here's a peek at her drawing development process--unlike my digitally addicted cartoonist self, she uses actual pencils and paper:

The Lady can grade. When she had trouble finding plus-size patterns from her favorite style eras (the 1920s-1940s), she just taught herself to size them up. (Considering how many bust size 32 patterns I continue to cling to, I had better get on that.) I can't tell from her blog what size this fabulous Hollywood 1486 dress was originally--but I'll just guess that she graded it and she can correct me if I'm wrong.

Don't you just love the cut, fabric and asymmetrical button front styling? (It should probably be noted that like many vintage lovers, Ms. NVL has a serious button problem passion).

The Lady can accessorize. And I don't just mean buying vintage accessories, though she does that too-I'm talking some major home millinery. (I don't even know how to wear hats properly, never mind construct and design them.) Check out her depression picnic cloche:

The Lady can repo. When she became obsessed with vintage sewing--and disappointed in the lack of patterns in her size--she didn't just grade them for herself. When Ms. NVL obtains particularly fabulous plus-size vintage patterns from the 10s, 20s, 30s and earlier 40s (i.e. the ones generally safe from copyright protection), she reproduces them, as in the examples above. Here's a 1920s "dustbowl" dress:

The Lady can teach. Who doesn't love a tutorial? (I swear I'll have some up here SOMEDAY!). Check out The Lady's (beautifully illustrated) Style Tips on:

The latter could have saved me some grief over the years, as I am pretty much guaranteed to get major runs in any and all stockings either while putting them on or in the first 10 minutes of wear. (Although I'm so pregnant right now that filing my toenails to ensure a snag-free stocking application will have to wait until I can actually see/reach said toes!)

And it's not a tutorial, but she also did a two-part "Black Hair" series on her blog with her thoughts on the pressure for black women to straighten their hair, her disappointment with the Chris Rock documentary Good Hair, and examples (with photos) of how she does a natural vintage hair style.

So there you have it, my first official Polka Dot Blog Crush! Be sure to visit Shelley's New Vintage Lady site, blog and etsy shop for a whole lot more vintage fabulousness. (And just to be clear, I'm not in any way sponsored by her or getting any kickbacks!)

LinkWithin

Related Posts Plugin for WordPress, Blogger...