
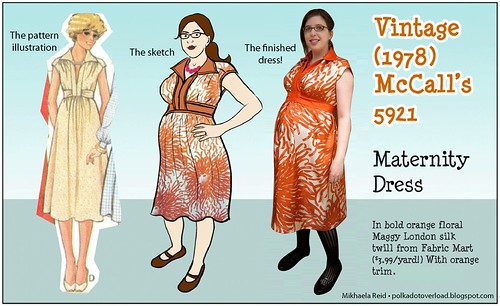
Pattern Review:Vintage (1978) McCall's 5921 "Carefree" Maternity Dress in Orange Floral Silk Twill.
It's done and I (mostly) love it, but there was NOTHING carefree about the weeks of blood, sweat and tears I poured into this dress. As I mentioned before, I'm not sure what possessed me to attempt all of the following on one project on a tight deadline:
- First vintage pattern
- First woven dress muslin
- First stab at sewing with silk...
- First time working with large-scale prints
- First collar
- First woven sewn garment in 5 years... and first woven dress in over 10 years (I've been on a knit kick!)
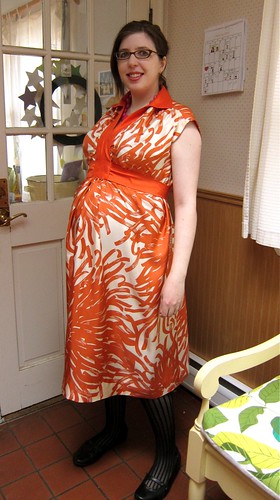
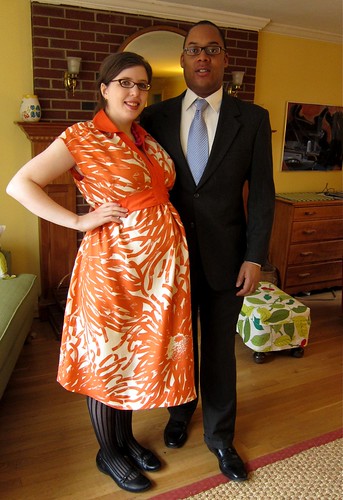
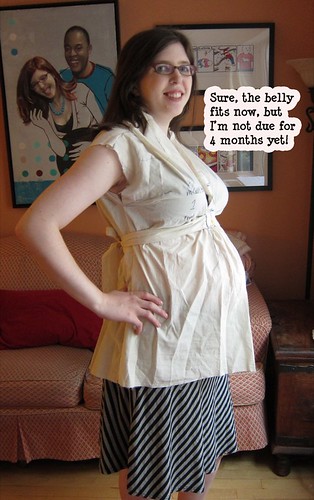
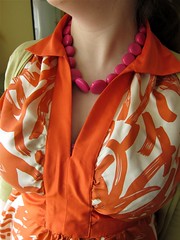
But never mind that! Here are various views of the dress before I wore it to my cousin's bar mitzvah today:

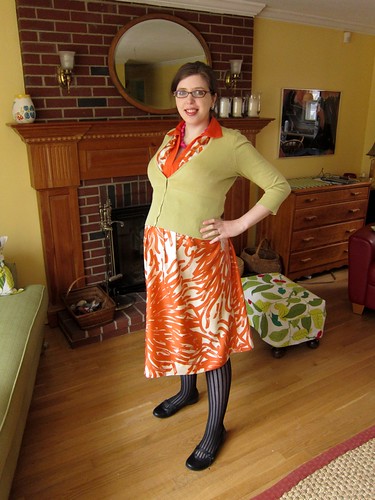
It looked cute with my chartreuse silk cardigan, too:
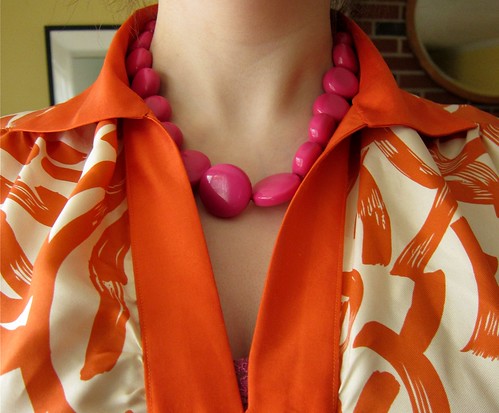
A closeup of the collar:
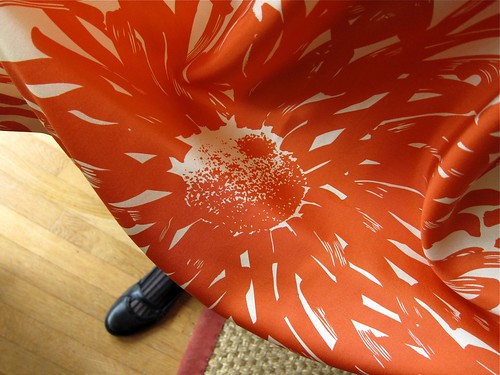
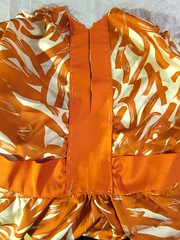
And the fabric:
Read my entire excruciatingly detailed review with photos of multiple muslins and FBAs and slashed/spread skirt pattern pieces after the jump!
Inspiration: Ever since I dove back into sewing this year I've been dying to play with vintage patterns, but due to my expanding pregnant belly couldn't make use of any of the wasp-waisted 40s and 50s lovelies in my stash. I bought a few vintage maternity patterns on eBay and Etsy, made some sketches using my digital croquis, and finally settled on this one as the most promising of the bunch.
Pattern Description: Loose-fitting sleeveless pullover maternity dress or top has collar and front bands and shoulder and belly gathers. The optional tie belt creates an empire shape and helps avoid a shapeless muu-muu tent look.
Pattern Sizing: Single size vintage maternity pattern -- size 12, bust 34. As with modern maternity patterns, you're supposed to choose a size based on your pre-pregnancy measurements, which I did. But the pregnant fit model this dress was designed for had a much smaller belly and bust than me, and much wider shoulders--loose-fitting as it was, I ended up adding 6" total at the bust and about 22" total to the tummy. Details below.
Did it look like the photo/drawing on the pattern envelope once you were done sewing with it? Yes, only more fabulous--and with an actual pregnant belly and not a tiny wasp waist.
Were the instructions easy to follow? Just as clear as most current pattern instructions I've used (unlike the instructions in the 1940s and 1950s patterns I own).
What did you particularly like or dislike about the pattern? I loved that it was both comfortably loose and figure-flattering (if made with the belt in the right fabric). The tie belt cinches me in at my only remaining smallish point now that my waist is gone. The collar and front bands (which I chose to make in a solid fabric) are also adorable, though there was no separate pattern including for the band facings or undercollar (I made my own so that the stitch lines would roll under).
I didn't like the wideness of the shoulders as they turned out--wasn't sure if that was a fit issue or a deliberate design issue. I'm also not crazy about the length, and plan to re-hem it a bit shorter.
Fabric Used: The main fabric is a bold Maggy London orange floral silk twill, bought online at Fabric Mart for $3.99/yard. Such a deal and SO gorgeous and SO me, but this was the hardest part of the whole project--this stuff slipped, slid and shifted so much it was like sewing sheets of Vaseline. The solid trim fabric is a much crisper and more cooperative nubbly silk "chantoune" bought at "It's a Material World" for $7.99/yard. Total fabric cost: about $16. The interfacing for the collar and bands was a soft knit fusible.
Pattern alterations or any design changes you made: What didn't I change! Here's what I did, in excruciating detail:
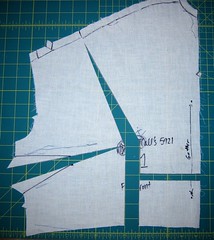
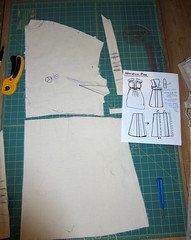
- Pattern Adjustments, Round 1 From measuring the pattern, I knew I'd need more fullness in the bust, especially in my drapey fabric of choice. I currently have a 35" bust and 41" full bust (thanks, pregnancy hormones!) but I started conservatively with a 2" FBA (adding 4" total extra fullness across both the bust and belly). I had to puzzle over how to do it with this oddly low armhole, and cut up my traced dress front about 6 or 7 ways before I got something I could live with. The original front was undarted (gathers and the tie belt did all the control work), but I was adding so much I distributed some of it into a horizontal dart (pink areas show my additions):
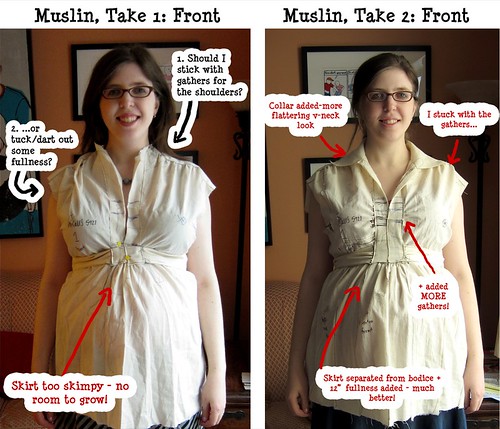
- Muslin, Take 1 I hastily basted together a top-length muslin from my altered front and unaltered back pieces, not bothering yet with the collar. The results were mixed--the FBA hadn't quite done the trick, and there was definitely NOT enough fabric across the belly:
- Pattern Adjustments, Round 2: I took apart the muslin, did an additional 1" FBA (2" total), added gathers to control bust fullness in the center front, separated the bodice and skirt, and slashed and spread the front skirt to add 6" (12" total) fullness.
- Muslin, Take 2: I basted the muslin back together, this time with the collar. Results were much improved, and I transferred my alterations to the pattern pieces.
- Fabric prep. I'm dry-cleaning-averse, so after testing colorfastness, I handwashed both silks in Eucalan woolwash (as suggested in Sandra Betzina's More Fabric Savvy), air-dried them, and spent a gazillion years ironing out all the wrinkles that resulted.
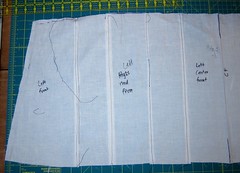
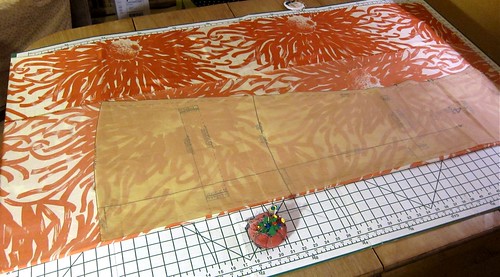
- Fabric layout. Not only was the silk twill as slippery as an eel, it featured a giant floral print requiring careful planning. So I put my cardboard cutting mat on the kitchen table and played around with different layouts. I made no attempt to actually match this giant-size pattern at any seams--the contrast trim and gathers made that level of masochism unnecessary--but I did avoid placing any of the flower motifs directly over my bust, belly or behind:
- The cutting. I really tried my best here, but I just could not get an accurate cut. I carefully straightened the fabric and pinned the selvedges and whatnot to the cutting board but this stuff just slipped like crazy and I later found that certain pieces just did NOT match up when sewing and had to be eased to each other. Much cursing was involved--good thing my little girl can't understand language yet!
- Assembly. I followed a hybrid of the pattern instructions and the instructions in Connie Long's Easy Guide to Sewing Blouses. My main deviation here was the crazy amount of hand-basting required to get the slippery fabric to even half-cooperate:

As mentioned above, I cut the undercollar piece and band facings slightly smaller than their parent pieces so the stitching line would roll underneath. This worked perfectly on the collar, and on the tops of the bands, but resulted in weird puckering on the part of the bands that didn't actually need to roll under. Lesson learned:
Gathering was also a huge pain--once I pulled the basting stitches to gather, the fabric didn't want to UNgather itself to match its intended finished width or length, and so some of the gathering turned out rather uneven. Also, every time I stuck a pin or needle in the fabric, no matter how sharp, it got these weird tiny runs in it radiating out from the hole. SO MUCH FUN.
I also attached the collar completely by hand while riding Amtrak from New York to Boston in a desperate failed attempt to get the dress finished in time for my baby shower.
Finally, I had terrible trouble with the hem--my mother pinned it for me at what seemed like the right length, and I pressed and hand-hemmed it, but it got all wavy and grew overnight, so it'll need a good re-hem to a more flattering knee length before I wear again.
Successes: Despite its flaws, I love this silky soft dress and learned a ton making it. I love the color, the fit, the pattern placement, the crisp collar and the evenly top-stitched bands.
Areas for improvement: Clearly I still need to work on my silk-handling, gathering and hemming skills. And I probably should have done something about the too-wide shoulders and super-deep camisole-revealing armhole.
References:
- For using large-scale prints: "New Rules for Large Prints" (Threads #118)
- For adding fullness to the skirt: Built By Wendy Dreses and Make Your Own Dress Patterns.
- For the FBA: Fit For Real People
- For assembly and collars/facings help: Fashion Sewing for Everyone and Easy Guide to Sewing Blouses.
Would you sew it again? Would you recommend it to others? I spent so much time perfecting the fit, I may indeed sew it again in a light cotton lawn print--or maybe not, since I'm running out of time for maternity sewing and have many other garments in the queue.
Conclusion: It was a long painful dress journey, but so worth it. I will definitely be wearing this dress to work and to any fancy-ish events in the last three months of my pregnancy.
See also: complete Flickr gallery with more photos of alterations, etc.


Wow! For all those setbacks, the dress looks amazing - you did a terrific job!
ReplyDeletewow! It looks amazing!
ReplyDeleteYou have serious fortitude. And it looks fantastic. I particularly love the pink with the orange. Excellent work.
ReplyDeleteIt may have been a lot of work, but the result is fantastic - you'll be so glad you have something so lovely to wear over the next few months! That fabric is great.
ReplyDeleteDid you try a walking foot to sew the silk? I finally unwrapped mine a few months ago and it made all the difference on the slippery fabrics.
It looks great! However, I wouldn't alter the shoulders since that length is what creates the cap sleeve effect. Though if that's what you mean that you don't like, then of course go ahead and make it sleeveless. Either way, it will look great.
ReplyDeleteThanks everyone! Sarah, I haven't gotten around to buying a walking foot yet, though I've been thinking about it--I'm just annoyed that the official one for my Viking Platinum 730 costs $99 (there is a generic one for $39 but I've heard mixed things). I used size 70 sharp needles, and my regular all-purpose foot and needle plate. I did order a straight stitch foot and plate but didn't get them in time.
ReplyDeletelsaspacey, you are probably right about the shoulders--it probably is just the design. I do like cap sleeves, these ones just seem a bit wider than I like.
It looks great and I love that print! Great job. Can't wait to see the next project.
ReplyDeleteI love it. And I love the cartoon of yourself!
ReplyDeleteYou look great! The dress is fabulous!
ReplyDeleteYou and your dress are beautiful. I love the colour and you did a great job on fitting!!
ReplyDeleteOoh, that is a lot! The walking foot is great though. I would watch out for the generic -- my (small) experience with generic presser feet has not been too good. I've done better with vintage ones, to tell the truth!
ReplyDeletefor your future silk projects, I recommend copying all the pattern pieces onto freezer paper, which you can iron on to the silk for accurate cutting and then peel off with no damage to the fabric. In addition, spray starch or spray sizing is my best friend when sewing the super slippery types of silk fabric. You'll have to wash the starch out after the garment is finished, but it makes a world of difference!
ReplyDelete