Monday, May 20, 2013

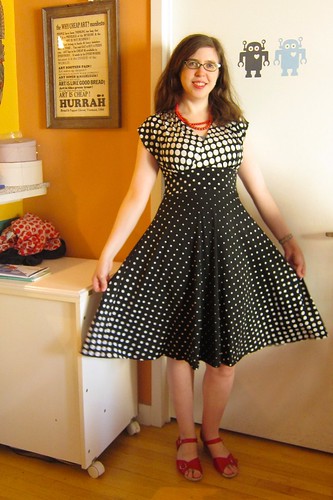
Hello, Hummingbird (Cake Patterns peplum knit top, #0289)

Hummingbird knit top by Cake Patterns in polka dots by Polka Dot Overload

Instant peplum gratification—this little Hummingbird took maybe me two hours to sew up, INCLUDING basting it together first to check fit!

A properly fitting peplum (seam snug at the waist, skirt at the right length and proportion) is a thing of wonder. It can suggest an hourglass figure, or accentuate one that already exists. Even better if it's in a forgiving, comfortable knit and can be whipped up in a single evening for a quick sewing high!

Me Made May 19: A Little Hummingbird Told Me

My mother has actual live hummingbirds in her yard, but try as I might I could not get one to land on me for my photos!

The pattern: Cake Patterns Hummingbird Peplum Top and Straight Skirt 0289. It's shipping this week, in case you're wondering! (Full disclosure: I'm the envelope illustrator for Cake Patterns and I designed the envelope and instructions along with my husband ... but I only work with Steph because I love me some Cake, and I sewed this top on my own time!)

Pattern Description: Knit top with horseshoe-shaped neckline, cap- or elbow-length sleeves, and four-leaf-clover-shaped peplum with different length options and optional dickey and cuffs. (There's also a woven skirt which I haven't made yet). I made the top in View Green (cap sleeves, no dickey or cuffs).

Pattern Sizing: The top is sized for a 30-59 inch full bust, and is also customized by actual waist size and front waist length (to ensure the peplum sits exactly at the waist).

  • My full bust is 38.5", so I chose the full bust size 35, then selected my actual front waist (17") and waist (29") sizes. Thanks to this size magic, the bust and waist fit perfectly in front, no FBA needed!
  • For the peplum, I chose the 20s size (proportioned for waist sizes in the 20s range), which created a neat little peplum perfect for wear over skirts. I think next time I will make the slightly longer 30s range peplum, for extra length over jeans... though it works fine as is, too... here it is at work on Friday:

Me Made May 17: Hello, Hummingbird!

Did it look like the photo/drawing on the pattern envelope once you were done sewing with it? Absolutely!

Were the instructions easy to follow? Again, rather surreal following along with my own illustrations (and Steph's instructions), but I find them quite clear and thorough if I do say so myself!

What did you particularly like or dislike about the pattern? My favorite part is the unique little four-leaf-clover-shaped peplum drape (in both front and back).

IMG_4546_editedHummingbird knit top by Cake Patterns - side view

Fabric: Soft, light-weight black & white polka dot ITY jersey from Spandex House, leftover from making maternity tops some time back. Excellent stretch and recovery, and it drapes nicely for the peplum (which I did not hem, as this fabric is not prone to fraying).

Pattern alterations or any design changes you made: Zip. Nope. None. A first for me, really!

Hummingbird knit top by Cake Patterns - back view

Would you sew it again? Would you recommend it to others? Oh yes and yes! I'm going to make my next version in true Hummingbird colors, I'm starting to get bored with all my monochromatic sewing I've been doing lately... this is a rayon-lycra knit I got at Mood last weekend:

Hummingbird-esque rayon/lycra knit large print

Wear for: Everything all the time. Dress it up with a pencil skirt (like the matching Hummingbird skirt I'm working on now!), dress it down with some jeans. Also good for hanging out with bubble-blowing toddlers:

Hummingbird knit top by Cake Patterns

A final thought: You know, I was looking again at the tagline for Cake and it occurred to me why I jumped on board so enthusiastically when Steph approached me about working on the art and design. "Sewable wearable basics for busy women—always with pockets." (What she doesn't need to say there is that Cake Patterns are fun, vintage-inspired and figure-flattering, too!)

Well, that busy woman is me—I sewed this top after a long day of work, followed by a long evening of trying to get my toddler to do all her medical treatments and finally go to sleep ... I didn't start sewing til past 10, so didn't finish til past midnight. But the satisfaction of being able to wear it to work in the morning was so worth it!

P.S. For those of you who bought the pattern during the presale or since, and are wondering when you'll get your itchy hands on it... it's shipping this week, in big pretty green, pink, orange, and blue envelopes!

P.P.S. I'm feeling seriously pleased with myself for already sewing two tops and refashioning a cardigan this month–so good to get back to my machine after my ridiculously long hiatus!!!

P.P.P.S. In case you're wondering why my photos look so much better than usual, I was visiting my mom in Massachusetts... so I borrowed her porch and her Canon Rebel camera! She's promised to let me hold onto it a few weeks more, too.

Tuesday, May 14, 2013

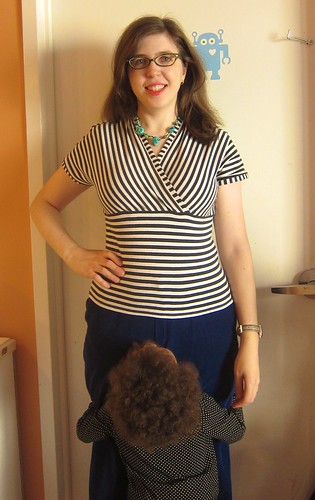
Finished: Tiramisu Striped Top (Cake Patterns 0144)

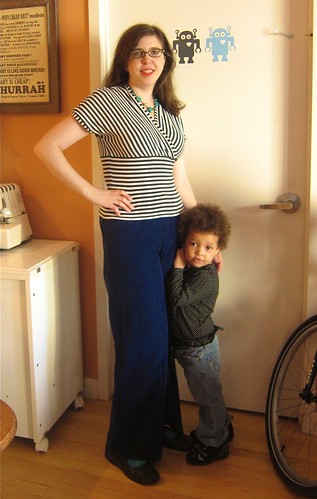
MMMay 14: Cake Tiramisu Top & Vogue Trousers

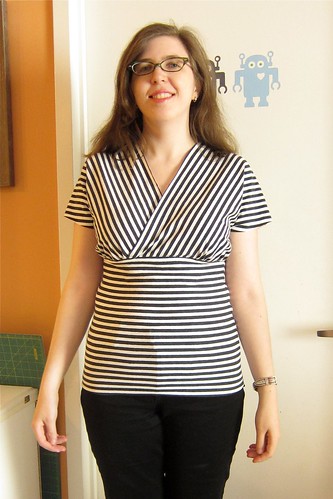
Striped Tiramisu top love! Don't you adore the directional striped neck and sleeve bands?

Oh, you know how it is... You wake up in the morning snuggled up in your handknit socks and striped me-made sleep bra and panty set. Then you pull on your Tiramisu top and your me-made corduroy wide-legs... just another day, right?

The pattern: Cake Patterns Tiramisu Dress 0144. (Full disclosure: I'm the envelope illustrator for Cake Patterns and I designed the envelope and instructions along with my husband ... but I began working with Cake BECAUSE I already thought what Steph was doing was so awesome.)

Pattern Description: Knit knee-length dress with front mock wrap neckline, cut-on sleeves, customizable midriff and half-circle skirt. (I left off the skirt for this test garment top version).

Pattern Sizing: The pattern is sized for a 30-50 inch high bust, 25-50 inch waist and has bust cup sizing A-D. My high bust is between 34 and 35" and my full bust is 38.5", so I initially chose to make a 35D.

After basting to check fit (as recommended in the pattern), I realized I should probably have chosen a size up instead of a size down ... so I tightened up the width and length of the front bodice pieces by quite a bit. Probably slightly too much (and I overdid the overlap, so it's somewhat more modest than intended), but this is a test garment, so I'm not about to unpick it now. (See Steph's underbust tune-up tutorial and video from the Tiramisu sew-along for more on how to do this).

Cake Patterns Tiramisu Dress as Top: Front View

Never mind my photo-bombing toddler... ("I love stripes Mommy!")

Did it look like the photo/drawing on the pattern envelope once you were done sewing with it? Why yes, though as a top.

Were the instructions easy to follow? It was a rather surreal experience following along with my own illustrations (and Steph's instructions), but I find them quite clear and thorough if I do say so myself!

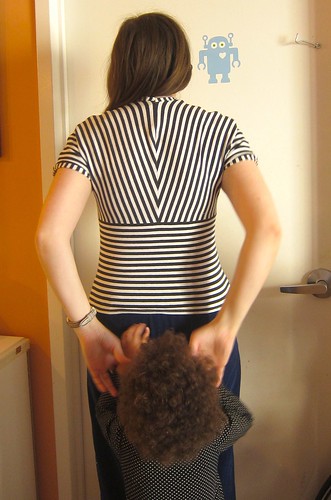
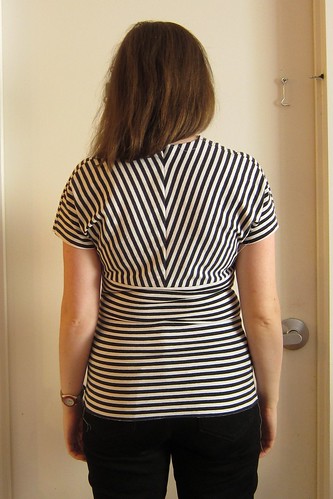
What did you particularly like or dislike about the pattern? It's such a flattering style on so many figure types, mine included. But my absolute FAVORITE thing is the stripe matching options... don't you love those striped sleeve bands and neck bands? AND the back chevron effect is some kind of awesome:

Cake Patterns Tiramisu Dress as Top: Back View

Fabric: Soft, medium-weight gray & white striped cotton-lycra blend jersey at $6/yard from Spandex House, leftover from making fun panties (which I'm actually wearing here, in case you're curious). It's very similar in weight/recovery to the much more expensive $15/yard fabric I'm going to use for the dress version.

Because of the stripes, I cut the pattern pieces out on a single layer to make extra-sure I aligned them with the stripe matching guide printed on the pattern. Cutting stripes on the fold can lead to stripey tears (ask me how I know).

Pattern alterations or any design changes you made: I left off the skirt, and extended the midriff band down and out to the hips a bit.

Construction notes: I made this on a mix of sewing machine and serger (now both repaired and working great) as recommended in the pattern instructions. I used a ballpoint twin needle for the hem.

My walking (aka dual feed) foot helped a lot in keeping the jersey from rippling out of shape and in pattern matching at the side seams—almost invisible, am I right?

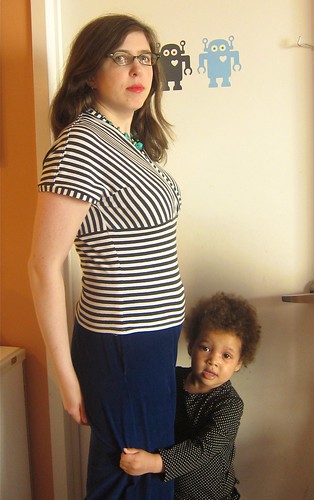
Cake Patterns Tiramisu Dress as Top: Side View

There is a side seam there... but I can barely see it! Thanks walking foot.

Successes:

Recommended Reading: Room for improvement?:
  • When I make the dress I'll try cutting a different size for the front bodice—probably the 30D—and play with it a bit before sewing real seams. It's really a matter of personal ease preference.

Would you sew it again? Would you recommend it to others? Heck yeah and triple heck yeah.

Wear for: Work, weekend, pretty much anywhere.

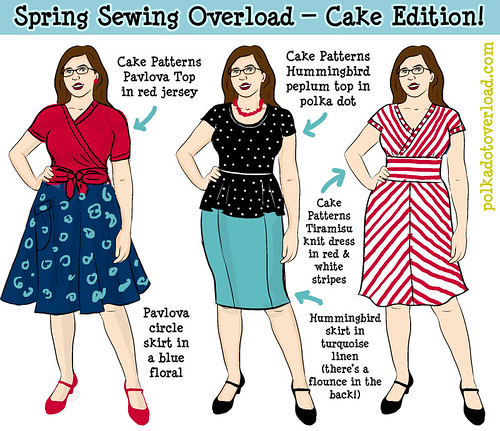
Readers, it feels good to be sewing again after my long illness! And I can't wait to make the dress version... in red and white stripes, of course:

Spring Sewing Sketch 2013 — Cake Patterns Edition

Then it's on to Hummingbird... and Bonny... and Pavlova... and... Cabarita... I think I need to clone myself! I have many other patterns in my queue but I've grown so attached to these after drawing them that I just need to bring them to life NOW.

Monday, May 13, 2013

Second Verse, Same as the First (Me Made Week 2)

Me Made May 10: Polka Dot Ombré Overload

The good me-made news is that although I pledged to wear at least one me-made four times per week, I've actually been rocking the me-made lifestyle EVERY SINGLE DAY and managing to squeeze in a photo to boot.

The bad news is my photo poses are all boring and almost all in front of the same backdrop, and I barely have anything new to show you, but, yeah, whatever. So here we go!

Day 5: Warm Wooly Accessories

Me Made May 5: Ready to Cheer my Husband at the 5 Boro Bike Tour

My husband was riding in the TD 5 Boro Bike Tour for Doctors Without Borders, so this outfit was all about this Doctors Without Borders T-shirt from an AIDS activism rally a few years ago. Since I was running out of me-made garments and it was super-chilly, I decided to stick to just accessories. Little Z had her Daddy's matching T-shirt and a me-made sweater.

    Me-Mades (FOUR of them!):
  1. Matching alpaca hat and cowl set: 18 Seconds Until Sunrise cabled earflap hat and Cherry Garcia cabled cowl.
  2. Waving lace socks again.
  3. Fetching mitts.
  4. My daughter's striped Toddler Tomten Jacket.
    Other:
  1. Doctors Without Borders "TREAT AIDS = STOP THE VIRUS" T-shirt.
  2. Not Your Daughter's Jeans Marilyn Straight Leg stretch jeans with natural waist (made in USA).
  3. Arcopedico Flower leather Mary Jane cut-out flats in black.
  4. Sprout eco-friendly purple watch made of Tyvek and corn plastic.

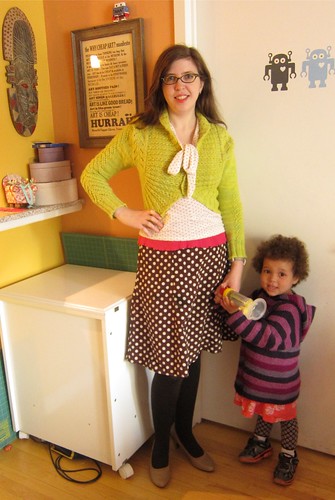
Day 6: Polka Dot Overload

Me Made May 6: Polka Dot Overload

I did mention I liked polka dots, right? And in case you're wondering what that odd yellow object is, it's the spacer for my daughter's daily steroid asthma inhaler.

One plus to Me-Made-May is that in order to look fancy for you all I'm wearing my heels much more often than usual... Otherwise I tend to fall into a rut and just wear the same comfy flats every day until they scuff away to nothingness.

    Me-Mades (FOUR again!):
  1. Jalie Scarf-Collar top the 2nd.
  2. Georgina cardigan in chartreuse.
  3. Brown and cream polka dot A-line skirt in cheap $2/yard poly fabric with petersham waist facing, made in 2005 pre-blog days and rather on the small side.
  4. Striped Toddler Tomten Jacket made for my daughter.
    Other:
  1. Spanx reversible tights, the brown side. (Best opaque tights ever, seriously!)
  2. Tsubo taupe leather comfy pumps with sturdy heel (similar and similarish).
  3. Sprout eco-friendly purple watch made of Tyvek and corn plastic.
  4. Pink silk rib knit lace-edge cami

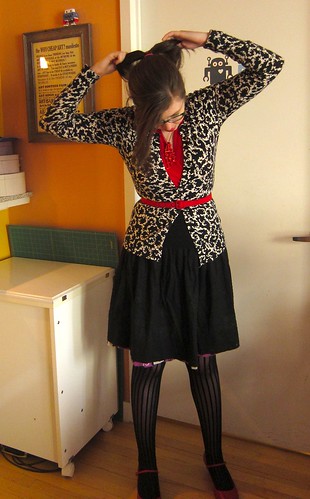
Day 7: Black, White and Red All Over

Me Made May 7: Black, White & Red All Over

The OTHER side of my reversible skirt from last week.

    Me-Mades (just one):
  1. Self-drafted reversible shirred skirt, the black swiss dot lawn side (originally a maternity skirt!)
    Other:
  1. Red coral necklace bought at Renegade Craft Fair, but can't remember the maker
  2. Red silk rib-knit surplice top, thrifted
  3. Black & white printed cardigan
  4. Red belt from Stop Staring dress not currently fitting me
  5. Fishnet-esque tights
  6. Camper Kim Mary Janes in sturdy red leather.

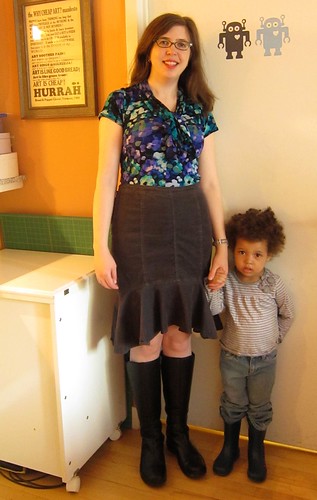
Day 8: Rainy Day Outfit

I swear little Z isn't actually grumpy here, she was saying "soy cheese!"

Me Made May 8: Rainy Day Outfit

I think this might be my favorite outfit of the week (with the possibly exception of the dress from Day 10).

    Me-Mades (just one again):
  1. Jalie 2921 scarf-collar floral poly knit top.
    Other:
  1. Merrell "Angelic Peak" black leather near-knee-high flat boots (waterproof). The only flat knee-highish boots I've owned since 2009 and still going strong!
  2. Gray corduroy gored skirt with mermaid flounce, gift from my mom. I SO want to make my own version in every possible fabric...

Day 9: Cardigan Refashion

Me Made May 9: Cardigan Refashion!

My first refashion for Me Made May!

    Me-Mades (three):
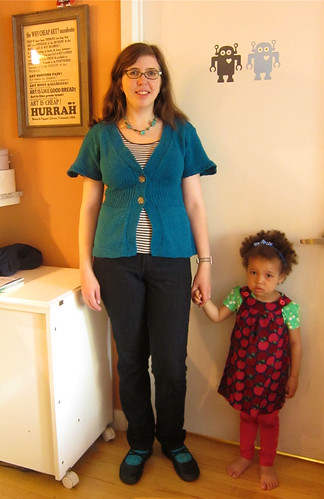
  1. Flutter-Sleeve Cardigan with a major refashion (tutorial and details here).
  2. Waving Lace socks.
  3. On my daughter: "A is for Apple" dress, now barely wearable and more of a little short tunic.
    Other:
  1. Turquoise necklace, made by my dear friend Márta as a birthday gift
  2. Striped knit T-shirt
  3. Not Your Daughter's Jeans Marilyn Straight Leg stretch jeans with natural waist (made in USA).
  4. Arcopedico Flower leather Mary Jane cut-out flats in black.

Day 10: The Ombré Dress

Me Made May 10: Polka Dot Ombré Overload

I know you're sick of this dress, but until my Tiramisu one is complete, it's all I've got.

    Me-Mades (one):
  1. Polka dot ombré surplice knit dress (McCall's 6070 top, self-drafted half circle skirt bottom).
    Other:
  1. Second Base Brittany demi lace cami (made in USA).
  2. Red beaded necklace, a gift from my mom
  3. Worishofer Women's 711 Ankle-Strap Red Sandals (aka "granny sandals")

Day 11: Driven to Fabric Shopping Desperation

Me Made May 11: Scraping the Bottom

Why yes, this is a poorly-made maternity top from back in 2010, tucked in so you can't see how long/low it hangs in front. BUT at least I managed to get outside for a photo for once—I had just finished with a little printed-knit-seeking shopping excursion to Mood Fabrics with Lee.

    Me-Mades (two):
  1. Burda Magazina 02-2010-122 knit top, maternity-hacked by me
  2. Brown and cream polka dot a-line skirt in cheap $2/yard poly fabric with a petersham waist facing... etc. Circa 2005. Never blogged.
    Other:
  1. Pink silk rib knit lace-edge cami
  2. Privo by Clarks brown leather flats with sneaker-esque bottom (similarish)

So, if you even made it to the bottom of this post, which outfit do you like best?

**Disclosure: Actions you take from the ready-to-wear hyperlinks within this blog post may yield commissions for polkadotoverload.com (and quite likely spent on yarn or fabric).

Sunday, May 12, 2013

Happy Mother's Day!

Me Made May 3: Pink, Red & Polka Dots

Woke up deliciously late this morning to breakfast in bed prepared by my husband (with a gift certificate to a local yarn shop on the tray) and a beautiful card drawn by my daughter. I'm going to take the day off from Me Made May but I'm hoping to be back tomorrow with a brand new top to show off!

A lovely day to you all, mothers and not-mothers alike!

Thursday, May 9, 2013

Sweater Surgery Success (Or How To Tighten Up a Baggy Sweater... With Your Sewing Machine!)

Sewing Machine Sweater Surgery Tutorial: Before and After

I cut into my sweater with a big scary set of shears... and it lived to be worn again!

Few things are as terrifying for a knitter of delicate constitution as approaching a painstakingly handknit sweater with a sewing machine and a sharp pair of scissors. That delicate garment into which you've poured your knitting heart and soul—building it gently stitch by stitch over weeks, months, maybe years—could all unravel in a matter of moments if you muck it up.

Many knitters would rather frog the entire thing themselves and reknit it at a smaller size.

I am not one of those knitters.

Instead, I am here to tell you that Baggy Sweater Repair Surgery (BSRS) CAN be done—and to encourage you to make an attempt at refashioning before tossing your too-big knit (or using it for a car cozy).

DISCLAIMER: Polka Dot Overload is not in any way responsible for any sweater runs, tears, ravels or other yarn injuries, minor or major, that may result from the application of scissors or sewing machines to handknit garments.

Yes, I came. I saw. I altered a hand-knit sweater... by MACHINE (I'm serious, you can do that—Eunny Jang says so!). And here's how I did it:

Supplies & equipment used:

  • Unwearably baggy hand-knit sweater.
  • Sewing machine with zig-zag stitch function
  • Ballpoint needles for machine sewing
  • Thread to match sweater color
  • Thread in a contrast color for basting
  • Darning needle for hand basting
  • Sharp shears (I use these)
  • Pins

Step 1: Assess the Magnitude of the Problem. This is a somewhat risky surgical procedure, so I wouldn't necessarily advise performing it on a frequently worn sweater that is ALMOST perfect. It's probably best reserved for the most critical of unworn sweater cases.

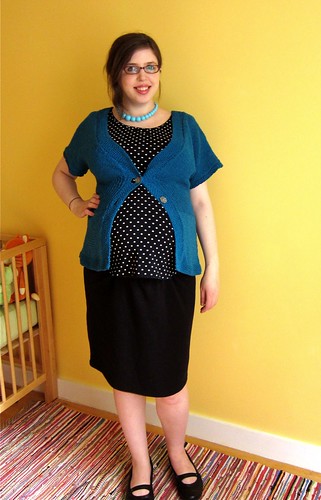
Now I originally knit my Flutter Sleeve Cardigan to the correct gauge in a size 36" bust (that's 2.5" of negative ease). However, because the yarn was a cotton-silk blend, it bagged and stretched over time, so it was even a bit too big back when I was pregnant:

Teal Flutter-Sleeve Cardigan remix (37 weeks pregnant)

Which means I haven't worn it in THREE YEARS. An ideal candidate! (Plus I needed it for Me-Made-May.)

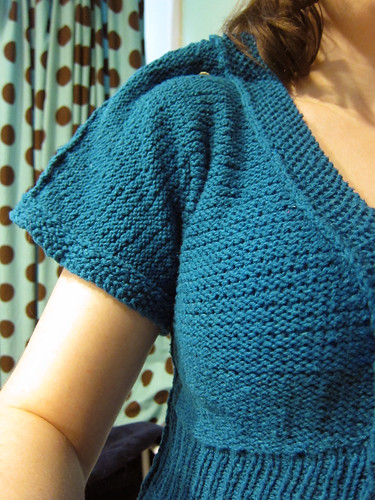
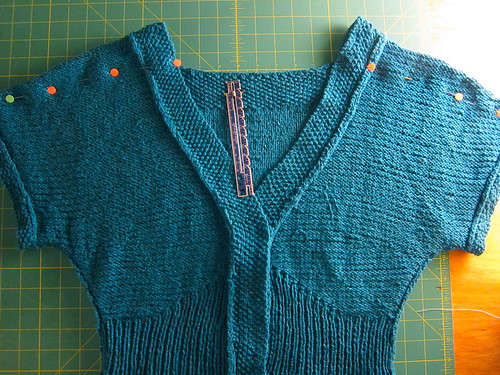
Step 2: Pin Out the Excess Ease. I tried my sweater on, and determined that the biggest issue was in the length over the bust—it had stretched out there by about five inches. I put the sweater on inside out, and carefully pinned out the excess ease over my shoulders while looking in the mirror:

IMG_2294

I determined that I needed to take out about 5" total of length (seriously!) vertically, about 3" from the front shoulder and 2" from the back. I tapered this out to 0" at the end of my sleeves.

Note that some baggy, stretched-out sweaters may also warrant taking in at the sides (at the side seams if they exist, or by creating side seams if they don't). And baggy sweaters with set-in sleeves might even require removing the sleeves and sewing them back on—but be sure to secure with a few careful rounds of zig-zagging near any areas you plan to cut (zig-zag set to 0.5 mm width, 1.5 - 2 mm length).

Step 3: Even Out Your Alterations. I laid my sweater down flat and carefully adjusted the pins on each side for symmetry:

IMG_2295

Step 4: Baste and Check Fit. There's really no going back once you sew into a handknit with a machine, so I wanted to make sure I was doing it right. Using white thread for contrast and a darning needle, I sewed a loose running stitch along the pin line, removed the pins and tried the sweater on again to be sure it fit (which it did!) At this point I also used my darning needle to close up the button holes quite a bit—they had stretched out so much the buttons were just falling out.

Step 5. Take a Deep Breath and Machine Sew it. VERY CAREFULLY. I sat down at my machine and very cautiously sewed a line of zig-zagging (0.5 mm zig-zag, with a 1.5 — 2 mm stitch length as recommended for sweater knits in my trusty copy of Sew Any Fabric) right next to my line of hand-basting stitches. Then I sewed a second line just for extra security. I made sure my stitches were well fixed at each edge, because even one unzig-zagged knit stitch could start a dropped stitch unraveling chain reaction of DOOM.

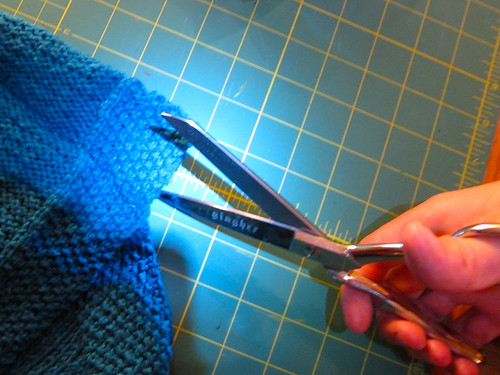
Step 6. Take an even DEEPER Breath and Cut Away the Excess. This part was hard. I kept checking and rechecking to make sure I wasn't cutting too close to the new seamline... EEEK:

IMG_2296

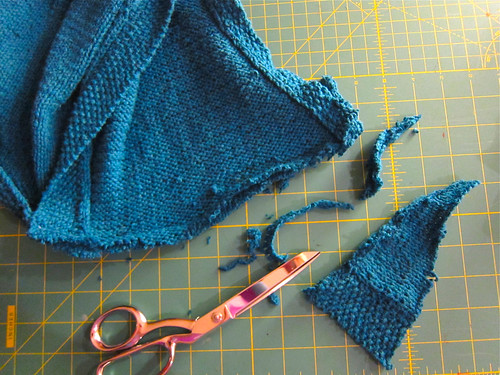
And then moments later, it was all over:

IMG_2298

I'm happy to report the sweater patient is recovering well and is quite wearable now, though still a bit less snug than I prefer. (And I'm still recovering quite well from my own actual surgery, as you can probably guess from the steep increase in activity on this blog).

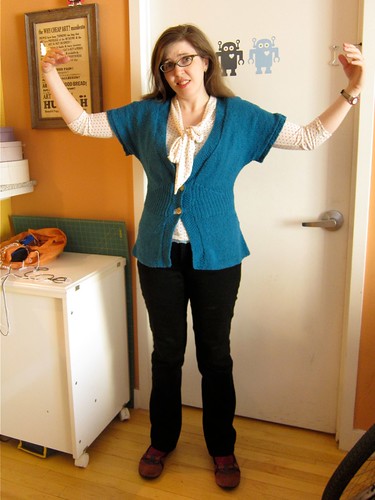
Me Made May 9: Cardigan Refashion!

I told you I was a RECKLESS sewist!

So tell me: would you ever sew and cut up a handknit — or would you rather reknit it from scratch?

Not-Goldilocks and the Three Sweaters, or How I Learned to Knit Something That Actually Fits

Mikhaela's Fitted Drop-Stitch Lace Tank

"The first sweater she knit was MUCH too small..."

Once upon a time there was a girl who learned to knit. First she knit some very wonky scarves, then some somewhat better hats, then a set of fingerless mitts or two. She started out with 99 cent Red Heart super saver acrylic and eventually graduated to cotton and then wool, and some of her creations started to actually be wearable by her friends and family.

For many years scarves and hats and baby sweaters made her happy, but one day the girl realized she was so very cold and no amount of scarves and hats would warm her and she couldn't wear those baby sweaters herself, cute as they were. What she really needed was a nice cozy sweater of her very own...

But the first sweater she knit (see top) was much too SMALL. "I can't breathe!" she declared, and into the charity donation pile it went.

Her second sweater was far too BIG. "I'm drowning in saggy baggy yarn!" she cried and into the refashioning pile it went:

Me Made May 4: Cardigan Refashion Needed

Eventually she learned a few lessons about ease and knitting and fiber choice and...

Her third sweater was JUST RIGHT.

My Spring Green Georgina Cardigan

And she lived happily ever after and never had any knitting fitting problems again! (Right? Right?)

So what's the magic secret to ensure a sweater you've labored and sweated over for months will actually fit when it's all blocked and sewn and finished up?

... Well, there isn't one. But I've learned over time there are a few ways you can give yourself a fighting chance!:

  1. Pay close attention to gauge -- and wash that gauge swatch the way you would the final sweater. I used to always skip that step out of impatience, but with my Georgina cardigan I did things right and actually washed and BLOCKED swatches of both stockinette and the lace pattern to be absolutely certain my gauge was right-on:

    Knitting progress
  2. Err slightly on the side of small. Negative ease is your friend. When I browse through finished sweaters on Ravelry, the number one issues I notice (and the main sweater issue my knitting friends seem to complain about) is too-baggy sweaters, like my second sweater above.

    If, like me, you like a nicely fitted curve-hugging sweater, you'll want to knit to final measurements at LEAST an inch or two (but probably a bit more) smaller than your actual bust and waist so that your sweater stretches to fit. You want to aim for this effect:

    And not this effect:

    With my successful sweater, I knit it with about 2-3" of negative ease. As I was going along, several people asked if it was meant to be for my daughter because it looked rather tiny, but after a good block, she was JUST RIGHT.

  3. That said, don't overcompensate for sizing issues. I made my first finished sweater (at top) from Stephanie Japel's excellent book Fitted Knits, which is chock full of great advice on, well, fitting your knits. (She also has a Craftsy class on fitting your knits, which I would suspect is excellent).

    BUT... when I started knitting and tried it on, it was a little bit too big. So I decreased. And decreased. And decreased some more as I went. And... Yeah, I seriously overdid it. So don't do that. You've been warned. Being able to breathe is a good thing.

  4. Choose a fiber with good recovery. Honestly, I think this was my biggest mistake with Sweater the First (knit in a cotton/tencel blend) and Sweater the Second (knit in a cotton/silk blend). Cotton and silk have very poor recovery and stretch and not so much elasticity and bag and sag over time.

    Even if you knit an in-the-round cotton sweater that you can try on as you go, it's not really a good predictor of how it will actually fit once you start wearing it. So they require extra fitting care and even more in the way of negative ease.

    Wool (and some of the nicer microfibers and acrylics if you must) on the other hand is plush and bouncy and springy and elastic. It tends to keep its shape and stretch with your body—but not too much. I've been wearing my Sweater the Third for weeks now, and it hasn't increased a bit in size. AMAZING.

    Note that this is NOT necessarily true of machine-washable aka superwash wools, which have had some of their little prickly bits smoothed off chemically to prevent felting. I've read that many of these bag and grow quite a bit after wash and wear. I'd rather handwash my sweaters than suffer another Sweater Size Tragedy, so non-superwash wools are it for me!

    (And for more on fiber and yarn choice, I cannot recommend Clara Parkes' fantastic book The Knitter's Book of Yarn: The Ultimate Guide to Choosing, Using, and Enjoying Yarn" highly enough.)

Phew! So what's your biggest knit fitting disaster?

Wednesday, May 8, 2013

Sweater Girl Showdown 2013: Which snug little cardigan to knit next?

Sweater Girl Showdown 2013: Which Cardigan to Knit Next? (Polka Dot Overload)

Cardigan indecision overload! Please. Help. Me.

As a knit-loving girl approaches the end of her second TARDIS sock, her thoughts naturally turn to... sweaters! Said girl will not dwell on the length of her Ravelry queue (though it might be said that even the most productive of knitters might take several lifetimes to complete it) but will instead look ahead to her very next project—another cardigan.

So... last time around I chose the Georgina in chartreuse.

This time I pondered knitting a serious vintage sweater pattern in tiny little fingering weight yarn from one of the A Stitch in Time books (both out of print but available as e-Books) (have you seen Laura Mae's beautiful Tri-Stitch Cable Jumper?!), but... I really need to bust my yarn stash, and the only yarn I actually have enough of is a big old pile of KnitPicks Merino Style DK weight in Eggplant (and a few other colors):

100_4517.JPG

Six Top Contenders:

1. Faith peplum cardigan by Kim Hargreaves from Heartfelt: The Dark House Collection.

  • Pros: Peplum! Cool stitch pattern details! A lovely curve-hugging shape!
  • Cons: No instant gratification of a quick online purchase... would have to order this book used and wait for it to arrive. GASP. CANNOT DEAL. Not sure about the not-slim sleeves, either.

2. Peggy Sue Cardigan by Linda Wilgus from her website Wooly Mammoth Knits.

  • Pros: Such an adorable vintage style--I love the figure-hugging waist cables and the short sleeves. And it's free!
  • Cons: I'm not sure if it would look too prim on me when buttoned up. And I passed it over last time—there must have been a reason why?

3. Cityscape Cardigan by Laura Chau from Twist Collective.

  • Pros: Little colorwork buildings marching around my neck!
  • Cons: Eternal plain stockinette boredom knitting hell once the neck fun is all over.

4. Agatha by Andi Satterlund of Untangling Knots.

  • Pros: If Lladybird has knit MORE than one of these, it's got to be an AMAZINGLY fun sweater to knit, am I right? Lots of cool details and shaping and lacy fun.
  • Cons: It might emphasize how short-waisted I am?

5. Cherry by Anna Ball.

  • Pros: Sweet little vintage-esque cardigan with a cute stitch pattern and defined waist, almost peplum-esque but not quite.
  • Cons: Does it actually make any sense to knit a short-sleeved wool cardigan? (pattern suggests cotton, but I do NOT knit cotton after several bad experiences with baggy saggy sweaters of stretched-out misery).

5. Delancey Cardigan (shortened version) by Alexis Winslow from her website Knit Darling.

  • Pros: Um, hello. STRIPES. CHEVRONED STRIPES. Plus, plunging neckline. Plus, full with color patterning.
  • Cons: Same (amazing) designer as Georgina. Not branching out and trying new pattern designers.

I was super super indecisive when I drew all this up... but now that I look at it, I'm dithering between just two, with a strong inclination towards one of them... can you guess? Which cardigan would YOU knit if you were me?

Sunday, May 5, 2013

Me Made May Week 1: Chartreuse, Polka Dots & a Reversible Skirt

Day 1: Georgina & Jalie With Jeans

MMMay 1: Georgina cardi, Jalie scarf top & Waving Lace socks
    Me-Mades (FOUR of them!):
  1. Jalie 2921 scarf-collar floral poly knit top
  2. Georgina cardigan by Alexis Winslow in chartreuse someone-else-handdyed Swans Island merino wool
  3. Waving Lace ombré knit socks, both me-made AND me-hand-dyed
  4. Striped undies adapted from RTW

Day 2: Plum and Fuschia Reversible Skirt Overload

MMMay 2: Plum and Fuschia Overload
    Me-Mades (just 1, but it's REVERSIBLE!):
  1. Self-drafted reversible shirred skirt, the Maggy London geometric side. This was the only maternity item I sewed in 2010 that still fits me now at 35 pounds lighter. I don't wear it too often because it's a bit of an awkward length (having been designed to go under a preggo belly) and doesn't seem to work well with tucked-in tops.
    Z-Made (by my 2-year-old daughter):
  • Colorful wooden beaded necklace. I love how she started out with just pink beads on one half, then got much more rainbow with it all. (Sorry, she's not taking commissions!)
    Other:
  • Silver Charm surplice top (made in USA).
  • Fuschia silk rib-knit lace-edge cami, bought ages ago.
  • Camper pink leather sandal wedges, bought ages ago (similar cross-strap Campers here).

Day 3: Pink, Red and Polka Dot Overload

Me Made May 3: Pink, Red & Polka Dots
    Me-Mades (1):
  1. Polka dot ombré surplice knit dress (McCall's 6070 top, self-drafted half circle skirt bottom).
    Other:
  • Pink lightweight cotton cardigan.
  • Second Base Brittany demi lace cami (made in USA). This is a really cool item that I'm sure you clever sewists could easily knock off if you don't want to buy one—it's a soft little cami that ends just below the bust with a band of picot lingerie elastic, and makes for a less bulky bra-cover-up under a dress than a full-length cami.
  • Red beaded necklace, a gift from my mom
  • Fishnet-esque tights
  • Camper Kim Mary Janes — sturdy heels in red leather... super comfortable even for decently long NYC walks.
  • Belt borrowed from my favorite 40s-style Stop Staring wiggle dress that is not fitting me at the moment. GRRR.

I finally got Z happily participating in the photo shoots. Her outfit isn't me-made, but she picked it out herself because she wanted to "match Mommy." She's wearing a second-hand colorblocked Hello Kitty dress hand-me-down courtesy of fellow Me-Made-May-er Lee of the Slow Steady. (Hurrah for hand-me-downs!)

Day 4: Jalie Redux in Red and Cream Polka Dots

Me Made May 4: Polka Dot Bow Top
    Me-Mades (2):
  1. Jalie Scarf-Collar top in red and cream polka dot knit.
  2. Monkey socks by Cookie A in kettle-dyed magenta superwash merino from Knit Picks (never blogged, but pictured in this post).
  3. Tardis sock the second, in progress (held, not worn).
    Other:
  • Blue silk rib knit lace-edge cami (had forever)
  • Not Your Daughter's Marilyn Straight Leg stretch jeans at natural waist in black. Yes, you have now seen the entirety of my jean collection—two pairs! (All I need, really, and I've even made do with just one in the past. But some day I'd like to sew some colorful ones...)
  • Privo by Clarks super-comfortable falling-apart purple Mary Jane sneaker flats I've worn to shreds over the last five or six years. (Similaresque Privos here and here).

I'm happy with this outfit but pretty soon I'll be scraping the bottom of the me-made barrel since I have so few!

That's it so far—I'm doing my recaps through each Saturday.

Observations so far on Me Made May:

  • Wow, this is fun...addictive, even! The Flickr community is really fantastic and encouraging.
  • I originally pledged to wear at least 1 me-made just four days per week, but now that I'm in the thick of it, I may even aim for five or six days per week.
  • I'm sure you're sick of the sewing corner of my living room, but the only way I'm going to get a photo each day is by keeping the tripod all set up in one spot.
  • There's almost no distinction between work wear and weekend wear in my life.

Which outfit from Week 1 is your favorite?

**Disclosure: Actions you take from the ready-to-wear hyperlinks within this blog post may yield commissions for polkadotoverload.com (and quite likely spent on yarn or fabric).

Saturday, May 4, 2013

In Progress: Tiramisu Top Muslin, Or the Over-Enthusiastic Bust Assessment

Tiramisu Muslin basted together: Too big in front bodice!

My basted-together Tiramisu muslin: So I think I chose the wrong cup size, huh?

So I'm making the Cake Patterns Tiramisu dress (reprinting now and temporarily on presale for $12) in red and white stripes as part of my Spring Sewing Plan, but before I cut into my super-nice fabric, I figured I'd test it with some other leftover stripes from the stash.

For variety, I decided to make it as a top, since I wasn't worried about fitting the skirt. I just extended the midriff down (too far down, I think). and shaped it out for the hips.

In sewing, it is always a perilous thing to ignore your actual measurements in favor of half-remembered or wishful thinking or denial measurements. Numbers and letters are just that. Now, back when I was pregnant, and then nursing, I got REALLY good at making extreme bust adjustments (for F, G, H and even at one point, I). But I recently weaned my daughter and I think I need to wake up to the new reality of more subtle E-cup bust roomage needs.

Anyway, my high bust is 35" and my full bust is 38.5. So I chose the size 35 by high bust, which I'm pretty sure was correct since it fits well in the back (and how cool is that chevron effect?!):

Tiramisu Muslin basted together: Back seems OK?

But for the cup size I chose the D, which I now think was a mistake, since according to the cup size chart it creates a finished measurement of 39.5"... a whole inch of positive ease when I prefer at least an inch or two of negative ease.

Plans & Observations:

  • I think I'll recut the two front bodice pieces as the 35B, which should be a finished full bust measurement of 37" (1.5" negative ease) and should remove some of the front length, too.
  • I was so careful with pattern matching when I cut the midriff pieces and the back bodice pieces but totally forgot about the shoulders. Oh well! I'll be more careful with the dress version.
  • The length is bad—way too long. I'll chop at least a few inches off the bottom before I hem it.
  • It is SO weird to be sewing from instructions that I designed (along with my husband). WEIRD. I remember drawing some of those diagrams and now I am following them!

How would you fix this?

P.S. Update! Somehow despite being part of the Cake team, I missed Day 5 of the Tiramisu Sewalong series, which is completely dedicated to the issue of fitting the bodice of the Tiramisu and tuning up the underbust seam, with videos and step-by-step photos. So here it is!

P.S. Speaking of over-enthusiastic bust roomage, I tried to put on my silk Flutter-Sleeve Cardigan for Me Made May today and boy does it need a refashion... when I was knitting it I became convinced it needed bust shaping and did all these improvised short rows... and then it stretched out after wear... and NOW:

Me Made May 4: Cardigan Refashion Needed

Friday, May 3, 2013

Quoted: On the Bangladesh Factory Collapse and Ethical Fashion

"The sad part is that the price of individual garments would not have to go up much — 1 percent to 3 percent, various estimates say — to provide a living wage and safer conditions for all those cutting and stitching what we wear. The cycle could slow or even stop. But that 1 percent to 3 percent would have to wend all the way down that river of production — past the eddies and breakwaters of corporate boards and middlemen, subcontracting agents and compradors, to reach those who really need it.

It’s well past time for all of us to reflect on this cycle and how cheap it would be to break out of it if only there were enough public pressure on the apparel industry. The cost for us is minimal; the cost for others is great. Bargain-hunters at Wal-Mart and haute couture customers on Fifth Avenue alike should shame those companies that pass the savings on to us as they pass the suffering on to others we never see. This is not a remote or distant problem.

Take a look at the tag on your shirt. The problem is as close as your skin."

—M.T. Anderson, from "Clothed in Misery", a recent Opinion piece in the New York Times

Aftermath of the Triangle Shirtwaist Factory Fire of 1911 (NYPL collection)
"These fashion companies and the entire American economy have formed a corrosive and now deadly reliance on cheap consumer goods. Corporations have persuaded consumers that cheap prices are fair. And this paradigm has hollowed out the middle class and led to the exploitation of both people and planet.

I am an impassioned advocate for small-scale, locally produced fashion. But where are the large fashion companies willing to take a risk and reinvent their brands around ethical fashion production? It’s time to trust that the consumer, all things being equal, will buy an ethically made product. We’re ready. It’s up to the brands to figure out how to do this and communicate it in a compelling way."

—Elizabeth Cline (author of Overdressed: The Shockingly High Cost of Cheap Fashion, reviewed by me here) on "The Case for Ethical Fashion" in The Nation

Children working in a North Carolina textile mill, part of a series on child labor by Lewis Hines taken between 1908-1912 (more here with original captions)

Recently, my mother called to tell me she had made a genealogy research breakthrough. She had finally managed to trace my great-great-great grandfather Thomas Marsh back to his childhood in England in a little town near Manchester...

...where the 1841 census shows him as a five-year old living in a textile factory workhouse with his 13-year-old sister. I imagine him something like the little children in the above photo—clambering up onto dangerous machinery, breathing in cotton fibers that scarred his growing lungs. (As a child growing up in Lowell, Massachusetts a "living monument to the dynamic story of the Industrial Revolution", such terrifying stories featured heavily in school field trips).

And then of course, there's the story of cotton in the American South. Tarantino's revenge fairytale spaghetti Western Django Unchained is full of vivid imagery, including close-ups of fluffy cotton bolls splattered in blood—it's a pretty apt visual metaphor, don't you think?

The story of the garment and fashion industries we often see and hear is a story about design, fun, creativity, innovation, genius designers, flashy runway shows and inspiring magazine spreads. But it is not often a story about ethics, respect for the rights, safety and livelihoods of garment workers, or environmental sustainability.

That story needs to be re-written. NOW. How do you think we can help?

Wednesday, May 1, 2013

Me-Made-May the 1st: Jalie and Georgina with Jeans (plus socks)


MMMay 1: Georgina cardi, Jalie scarf top & Waving Lace socks

I was somewhat tempted to throw on a me-made knit hat, cowl, and fingerless gloves to bring the total me-mades in this outfit from four to eight... but that's cheating, right?

I have precious few me-mades that currently fit, so expect to see all these pieces again. Again. And possibly again. Though I'll probably mostly do weekly roundups as seems to be usual Me-Made-May etiquette.

This outfit was easy, because I love all these pieces and wear them constantly. The scarf collar works well with the neckline of this cardigan, too.

I'm lucky to work in a casual-dress office where it's OK to wear whatever—jeans, T-shirts, nice dresses, blazers, etc. (Though a suit might look odd). But jeans are really the default daily uniform.

... oh, and I'm wearing me-made striped undies copied from RTW, but not going to show you on me (though they are shown flat in this blog post).

Observations so far on Me Made May:

  • Scrambling to photograph myself in the morning while getting Z ready for school is... challenging! I tried to get her to participate in the photo shoot, but she was not in the mood (and her cute Olive Juice dress isn't me-made, sadly, but a lovely second-hand gift from Lee of the Slow Steady):

    MMMay 1: Z is NOT into this
  • I need a pair of colorful flats—all I have are black or brown. I think colorful flats would have popped more, but I really struggle to find any that are actually supportive for lots of walking and not just flat and ouchy inside. Also, new shoes are not in the budget at the moment...

Hope your Me-Made-May is off to a fantastic start!

**Disclosure: Actions you take from the ready-to-wear hyperlinks within this blog post may yield commissions for polkadotoverload.com (and quite likely spent on yarn or fabric).

LinkWithin

Related Posts Plugin for WordPress, Blogger...