Showing posts with label shirring. Show all posts

Wednesday, June 6, 2012

A Shirring Fail + a Draping Attempt (T-shirt wedding dress progress)

So I finally started Monday night on that T-shirt wedding dress costume project for work--the skit is this weekend, but I have to have it ready for a fitting on Thursday. The above is my attempt at "draping"--it's just a bunch of XL size shirts cut up and pinned together on my dress form (which has now been adjusted to approximate the woman who will be wearing it). I'm digging the wide straps and the plunging wrap / sweetheart / surplice neckline.

My original plan was to fit the bodice with shirring:

But as I should have remembered from the great elastic shirring debacle of 2010, my sewing machine REFUSES to shir with elastic thread in the bobbin. Unfortunately, this T-shirt fabric is so thick and rough, it wouldn't even shir via the zig-zag method (sewing with a zig-zag over the stretched elastic thread).

So I sewed the skirt together from two of the shirts with an elastic waistband instead. The bustle or flare or train or flounce thingie is just part of those two shirts left on. I was disappointed that the logos on the shirts are so small, so I may (if I find the time) apply larger ones with T-shirt transfers or just fabric paint.

It was such a relief to actually get back at the sewing machine. I'm a bit stressed out by the deadline, but my husband (who helpfully cut up all the T-shirts for me) keeps reminding me that this thing only has to look OK from 20 feet away from the stage, and that it is supposed to look rugged/thrown together.

It is pretty freeing to be going pattern free and just randomly cutting, draping and sewing. I am the sort of person who usually spends hours carefully aligning and smoothing and pinning and cutting my fabric perfectly on grain and making sure I cut the pattern out precisely without slicing off any tissue and... no wonder I barely sew one garment per month.

I do hope that somehow I will also find the time to sew something normal for myself to wear in time for the Brooklyn BurdaStyle Sewing Club meetup Sunday, but if not, I suppose I could bring this.

So: do you ever go pattern-free and just wing it? What have your results been like?

P.S. Tonight, June 6, at midnight EST is the deadline to enter my vintage sewing pattern illustration giveaway! Thanks to all of you for the awesome entries so far!

P.P.S. My daughter's comment looking at the dress in progress on the mannequin: "Oh a dress! Pretty! Boobies!" Toddler wisdom at its finest.

Friday, May 21, 2010

Finished: My No-Pattern Reversible Shirred Skirt!

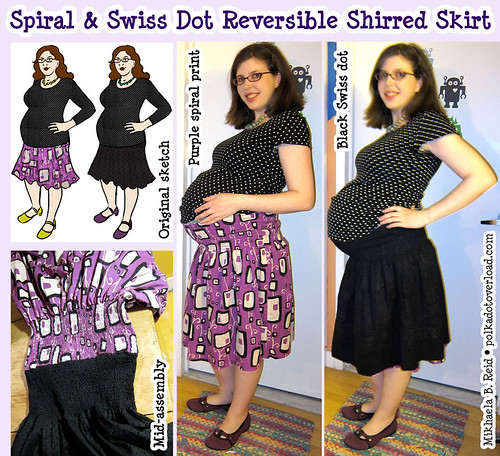
Finished: My Reversible Shirred Skirt! (36 weeks pregnant)

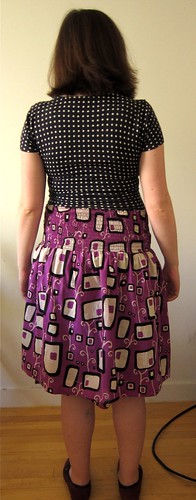
After all my trials, tribulations (and eventual triumphs) with shirring, I actually finished this skirt three weeks ago--just in time to be too exhausted to photograph it or write about it. But I have been wearing it (mostly the purple print side) and it's just what I wanted--comfortable, stretchy, cute, versatile, and totally wearable post-pregnancy too! It's shown above with the polka dot top I also sewed for the mini-wardrobe contest deadline I failed to make.

Side note: is my 36-weeks-pregnant belly a big round basketball or what? I know it looks cute, but it sure feels like a big lead weight!

Pattern Review: "Self-drafted" reversible full skirt with elastic shirred yoke. (If you can really call playing with a bunch of rectangles "drafting"!) I originally planned to modify this purchased non-reversible Burda 7910 skirt pattern, but it turned out to be a circle skirt which just didn't work with my fabric.

Inspiration: I needed 4 pieces for the mini-wardrobe contest that could combine to create at least four outfits. I decided to do 1 top, 1 (reversible) skirt, 1 dress/jumper and 1 top/cardi/jacket.

The reversible skirt was inspired by a RTW Gap skirt my mother gave me ages ago. On the fit side, it fit me just fine before pregnancy, but continues to be comfy and wearable after 40 additional pounds of bust, belly and baby.

On the versatility side, I found it great for travel. Cartoonist Husband and I traveled around the Yucatan penninsula in Mexico by bus in 2007 and last year, and around London, Amsterdam and Southwest France and Paris via train, subway, bus, ferry and car. So we were all about packing light--just one carry-on sized bag each. Reversible shirred skirts are PERFECT for that, and they don't look so bad even when wrinkled.

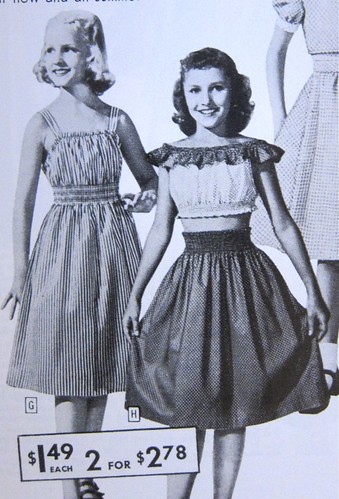
Shirred skirts were also popular in the 1940s and 1950s for women's and girls "play" clothes--or so I gather from the Sears catalogs of the time.

Also, I needed an excuse to buy that fabulous Maggy Lawn cotton print from Emma One Sock before it sold out.

More photos:

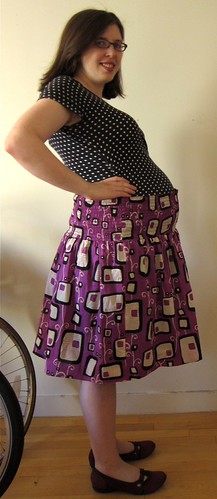
Note: I know the hemline here looks like it's WAY below the knee, but it's actually just below--I think it's the angle of the camera on my tripod making my legs look short.

Another side view and a front view (since I don't usually pull up my tops to show the yoke!)

Finished: My Reversible Shirred Skirt!Finished: My Reversible Shirred Skirt!

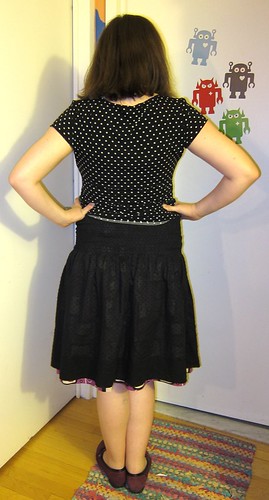
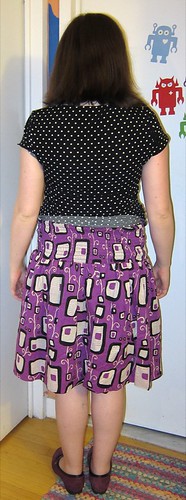
Back views: (Somehow the purple skirt seems to peek out from under the black skirt despite them being hemmed exactly the same, but I just don't care all that much)

Finished: My Reversible Shirred Skirt! (Back View)Finished: My Reversible Shirred Skirt! (Back View)

Entire review--with some explanations and in-progress photos--after the jump. I had meant to do a proper tutorial with diagrams and all that, but that will have to wait.

Thursday, April 29, 2010

How's My Hemline? + Polka-Dot Work Outfit

Pinned up hemline--is this a good length?

Please ignore the bad lighting and the fact that I would NEVER actually tuck this top into this skirt in this fashion--how's my hemline?

Oh how I hate hemming! I feel like I can never get the length quite right. I know many reputable sewing experts say you need a helping hand for proper skirt hemming. But Masheka is no hemming expert, I don't really trust Matilda, and with my waistless 33-weeks-pregnant belly, I have a hard time figuring out where the TOP of the skirt should sit, never mind the bottom. So my skirts always seem to end up oddly long or oddly short.

Anyway, I managed to take a half-hour break from decluttering and iron and pin a 3 1/2" hem on both sub-skirts of my reversible shirred skirt. I used my usual not-so-accurate method--looking in the mirror and bending over as best I could and playing with pins until it sort of looked ok--to determine that amount.

What do you think? Should I go ahead and sew this baby up? I'm aiming for a just-below-the-knee look. Here are side and back views--and no, I don't have frighteningly large elbows, that's just a perspective error.

Pinned up hemline--is this a good length?Pinned up hemline--is this a good length?

I had hoped to wear it to work today, but instead I went for a navy, red and white combo (partly inspired by Susannah's Fashion on the Ration color scheme). I used to worry that red and blue together would make me look like I was dressed up for the Fourth of July, but I first tried wearing red pants with this same navy and white polka dot top about a year ago and fell in instant color scheme love.

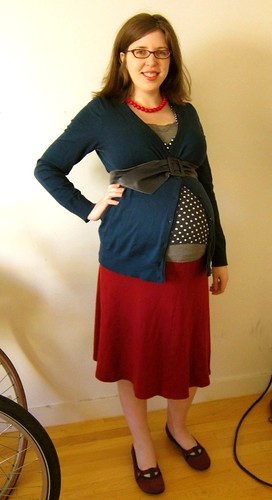
Polka Dot Red Navy, Red and White Work Outfit; 33 weeks pregnant!
  • Red plastic beaded necklace from cheapo costume jewelry store. Cost: $4. Cost per wear: 10 cents.
  • Blue cotton LOFT maternity cardigan: gift from Mom Cost: Free.
  • Blue fake leather belt from random NYC discount store. Cost: $10. Cost per wear: $1.42.
  • Gray lacy camisole: LOFT. Cost: $14. Cost per wear: 35 cents.
  • Navy and white knit polka dot wrap top, LOFT. Cost: $20 (sale rack). Cost per wear: 66 cents.
  • Red knit skirt, thrifted. Cost: $2. Cost per wear: 5 cents.
  • Purple nubuck flats: Privo by Clarks. Cost: $80. Cost per wear: $4.40.

Total Cost: $130.

Total Cost Per Wear (so far): $6.98.

Knits are a pregnant girl's best friend! The only genuine maternity-wear item in this outfit is the cardigan--the rest are all just stretchy items I've had for ages. And the cardigan is actually a bit on the loose side even at 33 weeks, hence the belt.

Yes, I probably should have ironed this, but that would be deceptive--I rarely iron knits, even when they need it.

P.S. In case you're wondering, yes--I got a haircut! But don't worry--I made sure it was still long enough for a lazy ponytail.

Tuesday, April 27, 2010

Almost Done: The Reversible Shirred Skirt

I haven't had much actual sewing time lately, what with my sewing machine troubles and the childbirth classes and the apartment-decluttering rampage. But! I finally got some time in yesterday morning and finished my endless rows of shirring. (Which, as Heather discovered, can be a SLOW, BORING and PAINFUL process--sorry Heather!)

The above image is what it looked like after I attached the two skirts together at the waist. I just have to tack them together and hem it now. AND I'm happy to report the stretch fit is perfect--it looks just like my sketch, and should still work post-preggo, too.

Reversible Shirred Skirt Sketch

Tuesday, April 13, 2010

Shirring World Domination

Successful shirring, at last!

Elastic shirring is hardly a show-stopper. It's considered a basic, easy, shortcut of a sewing technique--something you find in a "Quick to Make" skirt (like this one from Ottobre Woman's February issue) or a simple sundress. It doesn't command the respect of, say, perfectly bound buttonholes, smooth piping or welt pockets.

I don't care. After all my shirring trials and tribulations, I am proud to announce that straight, evenly gathered shirring HAS BEEN ACHIEVED.

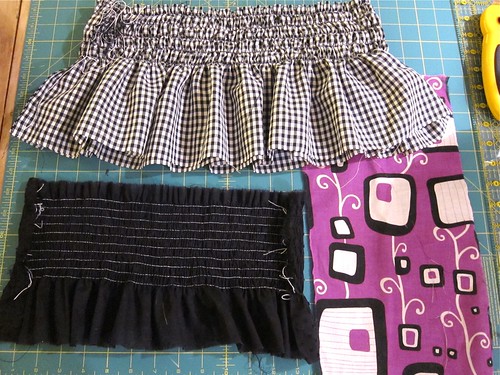
In the end, I gave up entirely on the hand-wound elastic thread in the bobbin method. Instead, I went with my mom's favorite technique, and one recommended by one of my Burda envelope patterns--just holding the elastic thread straight on the wrong side of the fabric and zigzagging over it to create a tight casing. The gingham pictured above was the test yoke (too wide and loose), and the black cotton swiss dot lawn is the inside view of an actual piece of my final reversible skirt yoke, as you may recall:

Reversible Shirred Skirt Sketch

One advantage of the zig-zag method is that you can more easily control how much gathering takes place--I just cut 15" pieces of elastic thread, so the yoke sections are each gathered to exactly 15" wide when resting (and will be slightly smaller once steamed). I got the lines parallel (3/8" apart) using a quilting guide bar (I had started to draw in guidelines with tailor's chalk but found it tedious and unnecessary). Once I baste the yoke pieces together, if it's still too loose, I can draw up the elastic threads (just as if I was gathering), or sew the yoke a bit smaller before attaching the skirt.

Oh, and another plus: no need to keep hand-rewinding the bobbin!

The downside? I sense it's quite a bit slower than the elastic-in-bobbin method--but at least it works. And a big part of the snail's pace is just me holding up the shirred yoke after each row to admire it.

Whether I've perfected my technique in time for Friday's mini-wardrobe contest deadline is another matter. But still. I came, I saw, and I SHIRRED.

P.S. As before, I continue to pledge not to let this get to my head. I may heart 1940s style, but there will be no Mommy & Me elastic-shirred playsuits with attached panties, not even polka-dot ones.

Mommy and Me 1940s Playsuits

Thursday, April 1, 2010

Shir it Up! (Or: How to Add Elastic Shirred Areas to Your Garments)

Shir It Up!

Adding stretchy areas to woven garments with elastic shirring thread is a great way to create a fitted, yet comfortable silhouette

I'm sorry to report that my shirring experiments (begun Sunday) are not going swimmingly. As I understand it--from reading gazillions of message board posts and online tutorials and the instructions for the few patterns I have that involve shirring--there are two main methods of applying elastic shirring thread (pictured below):

  1. Sewing with a zig-zag stitch (with all-purpose poly thread in both needle and bobbin) over the elastic thread as if it were cording. This works, but it's a bit tricky and slow—it's hard to keep such a thin little piece of elastic set up in a straight line.
  2. Handwinding the elastic shirring thread (I used Stretchrite) into the bobbin, and achieving some magic marriage of tension and stitch length that would cause the fabric to bunch up and shir as you sewed.

I've been working at number two and failing. I've had no problem getting evenly spaced lines of shirring exactly 1/2" apart (using a quilting guide, plus it is gingham fabric after all)... but it just doesn't magically shir, even when I steam it! I feel like I have tried every possible stitch length and upper tension setting (my Viking doesn't have separate bobbin tension to my knowledge) there is!

I've tried winding the elastic on the bobbin loosely and more tightly. Nothing. So I've resorted to just treating the elastic thread as if I were gathering--I stitch with the longest stitch length on a medium tension setting and then I pull the elastic threads from each end until it gathers up the right amount.

Except the waistband pieces I am shirring are 40" wide and so I have to reload the bobbin with elastic thread every two rows. So it's slow, slow going. Maybe I won't make the shirred waistband piece 10" deep after all... maybe just 5"?

Update from 2013: I finally figured it out! I was winding the elastic thread into the bobbin BACKWARDS. Now I can shir perfectly straight lines like MAGIC. Try it!

Sunday, March 28, 2010

Greetings from the Shirred Skirt Test Lab

Shirred Skirt Inspiration from the Sears Catalog

Shirred Skirt Fabulousness from the 1949 Sears Catalog

In between muslining my Sencha blouse, schmoozing over falafel with the fabulous Bloggers and Blogettes (more on this later!), fighting off a nasty cold and decluttering the apartment for Cartoonist Baby, I've been working out the pattern-free pattern for my reversible shirred-waist full skirt:

Reversible Shirred Skirt Sketch

This skirt is the foundation of my spring mini-wardrobe contest plans--like the no-elastic yoked knit skirts I've been making, it should be stretchy enough to accommodate the most pregnant of bellies, but will still work just fine post-maternity.

But, horrors! As you recall I hit a roadblock recently when I discovered that my purchased Burda shirred-yoke skirt pattern was a circle skirt that just Would Not Do with my vertically patterned purple cotton lawn.

What I really needed was a pattern for a full skirt, like this 1950s number:

Shirred Girls' Skirt and Dress from 1940s Sears Catalog

Or like this RTW reversible Gap skirt (the reverse side is a solid). It's not a maternity skirt at all, it fit me just fine before I gained 30 pounds of belly, bustage and baby, AND it is still quite comfortable in my third trimester!

RTW Reversible Shirred Skirt

Except no pattern is really needed at all for a dirndl/full skirt--as Gertie revealed in her tutorial on a non-elastic version, it's just a bunch of gathered rectangles. All you do is choose how full/gathered you want the skirt to be in relation to your hips (two times? three times?), "draft" a waistband piece, gather, cut and sew.

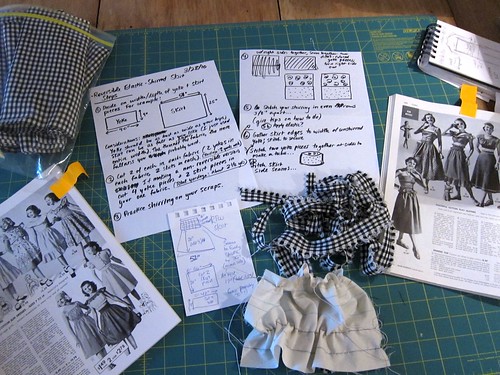
Construction is a bit different for a reversible elastic-shirred version with a deep yoke instead of a waistband, of course. And I've never shirred a stitch before in my life. So here's a peek at the Mikhaela test lab:

The Shirred Skirt Testing Lab

As you can see I've worked out some measurements and a likely construction sequence and cut out my (wearable) test garment pieces in a small-scale gingham ($1.50 a yard from Fulton Fabrics!). Right now I'm playing with different elastic shirring techniques on some muslin--none of my sewing reference books are very detailed on the subject, and online tutorials and advice differ widely on ideal stitch length/tension and how tightly the elastic should be wound on the bobbin.

I don't know yet if the test tube version of my shirred skirt will be a success, but once I achieve World Shirring Domination I promise not to take it too far:

Shirred Cotton Play Dress w/ Attached Panties from 1940s Sears Catalog

Mommy and Me 1940s Playsuits

LinkWithin

Related Posts Plugin for WordPress, Blogger...